CrowdWater | SPOTTERON
App Manual
The CrowdWater App

Leaflet CrowdWater App (English) / Leaflet How to place the virtual staff gauge
- Start Screen
- New Spot: Virtual Staff Gauge (Water Level)
- New Spot: Physical Staff Gauge (Water Level)
- New Spot: Soil Moisture
- New Spot: Temporary Stream
- New Spot: Plastic Pollution
- New Spot: Stream Type
- Update Spot
- Advanced Options: Streamflow Estimation
- Social Media
- Badges
- Frequently Asked Questions (FAQ)
Start Screen
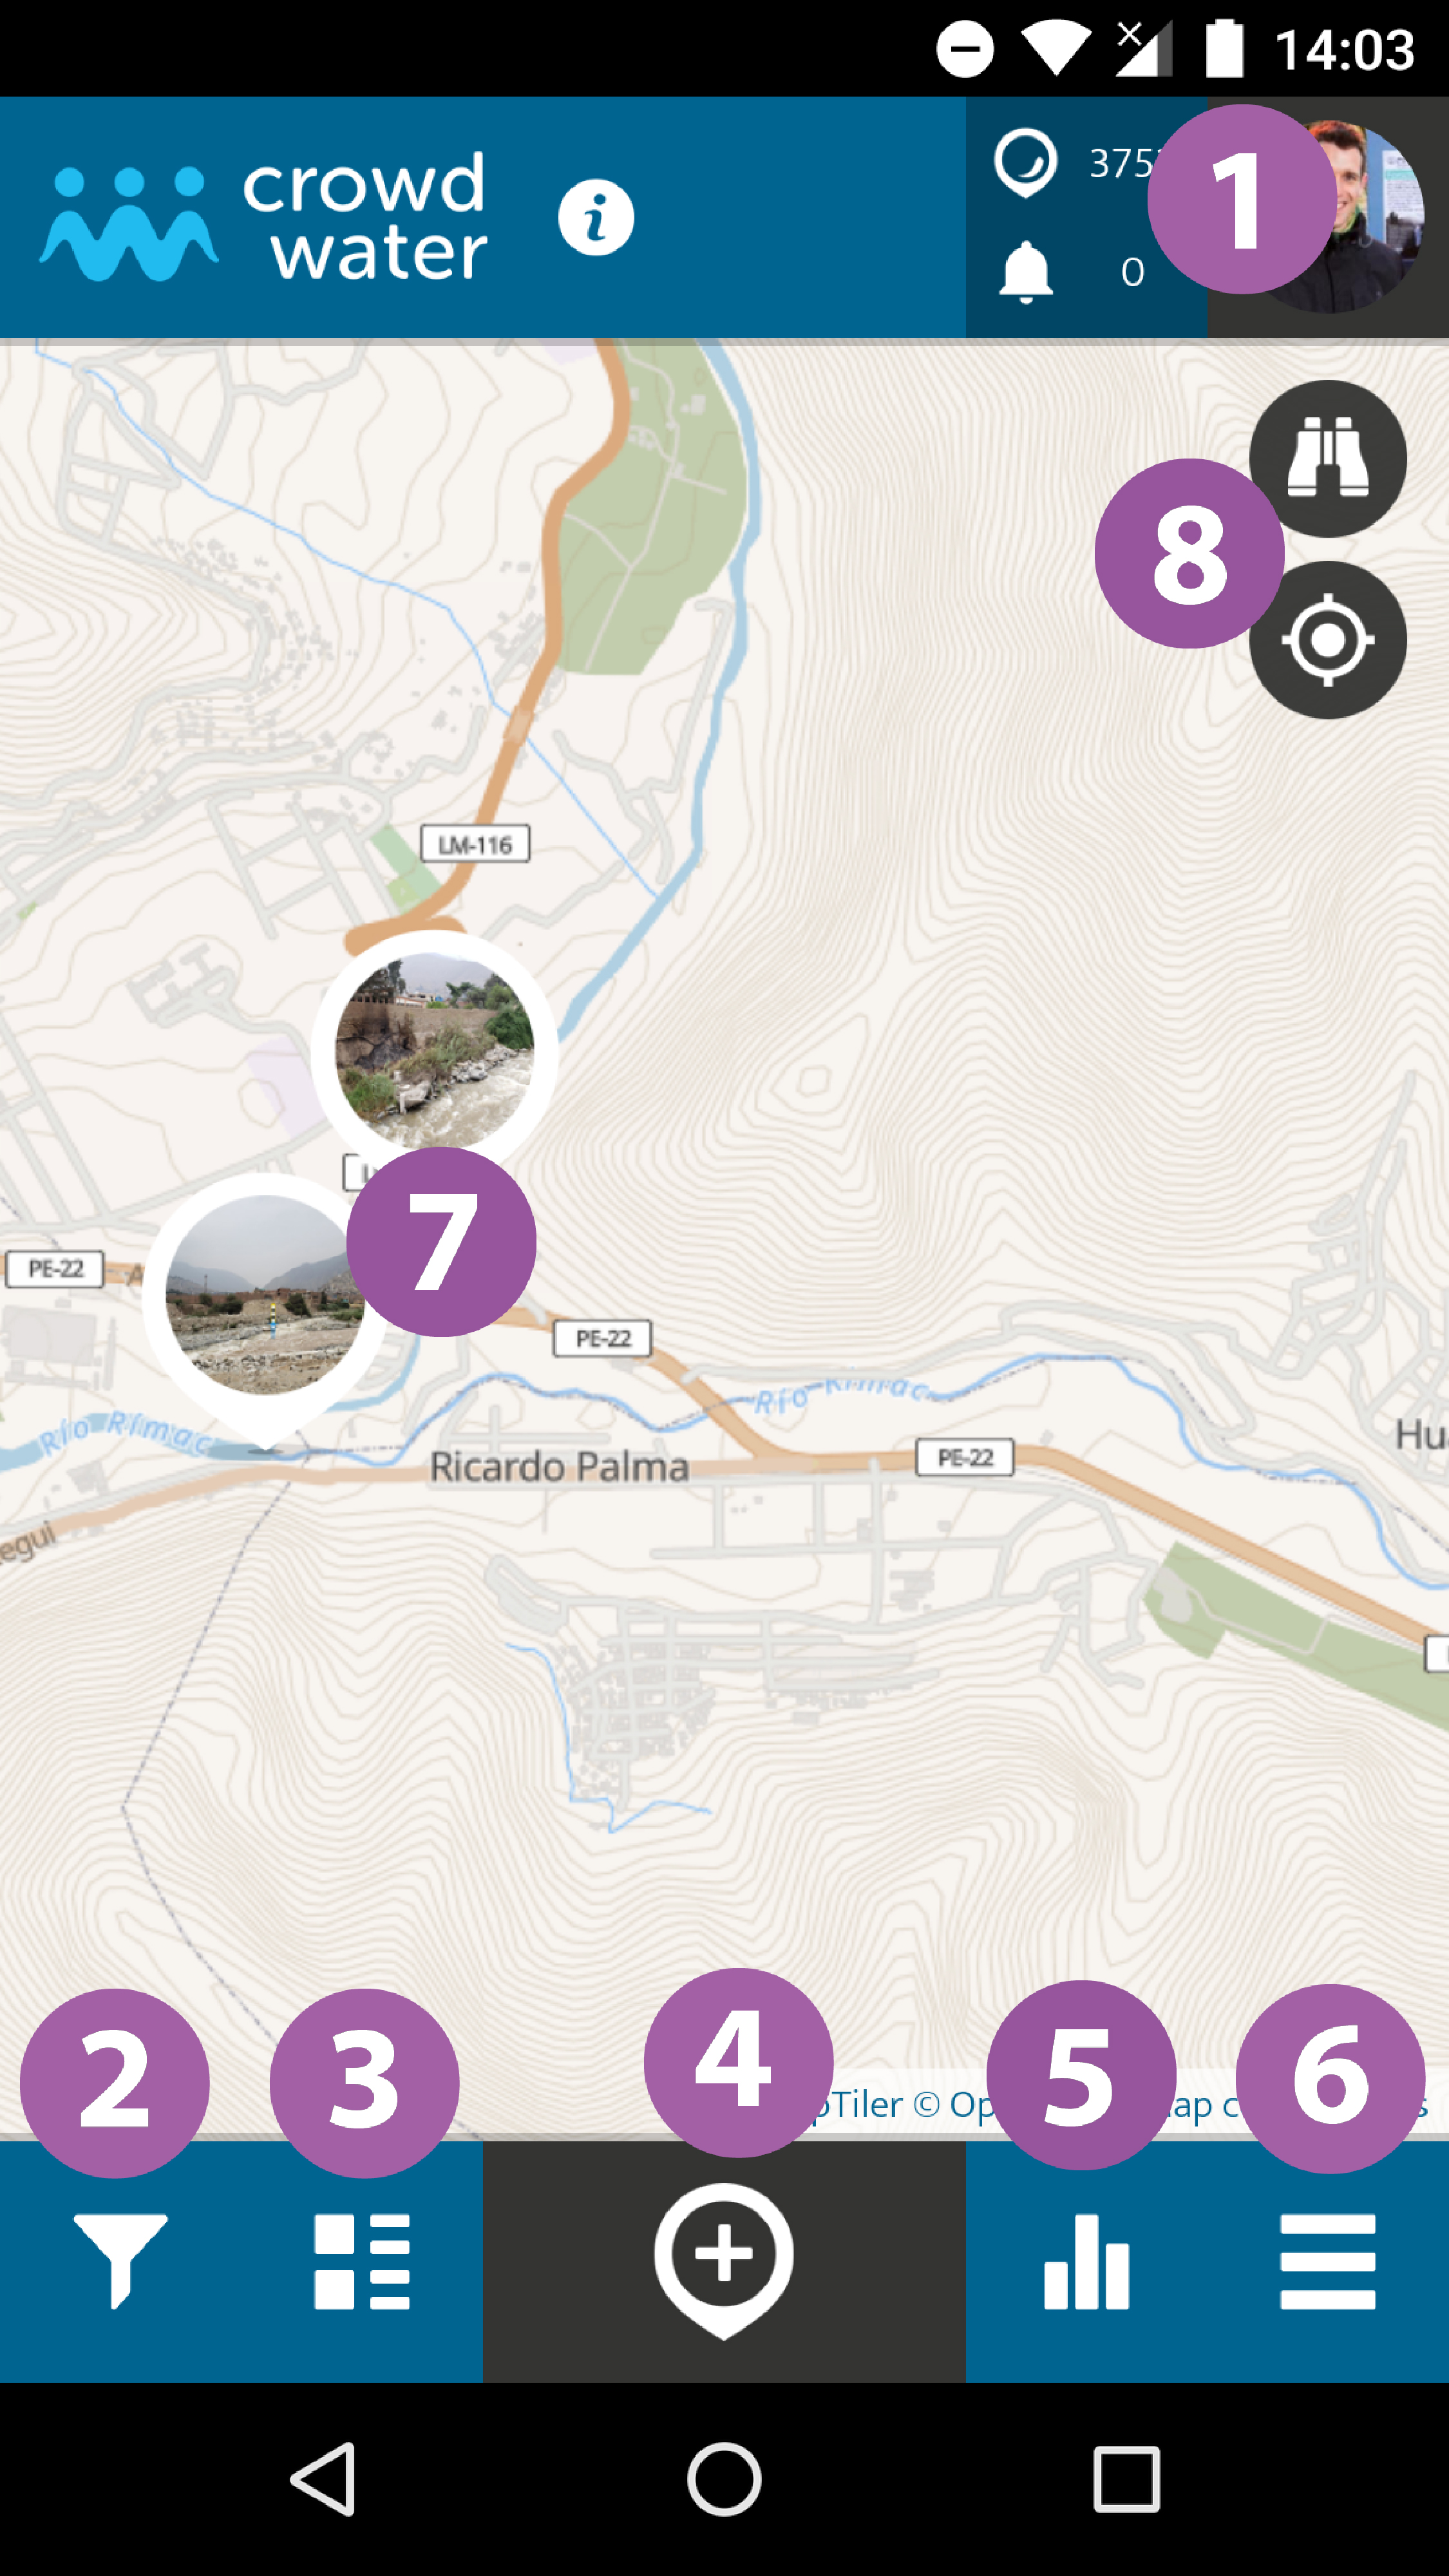
 In the user-area in your app you’ll find your personal newsfeed with the latest activities of your friends and of the CrowdWater project, the collection of your spots, your badges and your profile information. If you swipe left or right, you’ll find the list of users who are following you and those you are following.
 In the filter-area you can filter the spots that are displayed in the map using different criteria. With the reset filter-button you can go back to the standard of displaying all spots again.
 Here all the observations that were made in the app are listed chronologically. You can extend the header and list only spots displayed in the current map extent and or display only “Top Spots”.
 Here you can enter and upload new observations (Virtual Staff Gauge, Soil Moisture or Temporary Streams, Physical Staff Gauge, Plastic Pollution, Stream Type). There are different fields to fill in or actions to take, depending on the choice you make. With SAVE you submit your contribution, with the hour glass symbol you save your observations for uploading them later (e.g. in case you don’t have an active internet connection).
 This is the leaderboard of all participants. Here you can see the number of contributions of all participants. You can display the highscore by week, month, year, or over the entire time the project has been running.
 This is the main menu. Here you’ll find information about the CrowdWater project and you can add new spots, edit and upload waiting spots that were not uploaded due to a lack of an internet connection, pre-download spots and maps to display them offline, change the background map and change the language or log out.
 By clicking on a spot, you can examine it closer and also add new measurements.
 By clicking the binoculars-symbol you can search for places and addresses similar to Google Maps. With the cross-hair you can center the map to your current GPS-Position, if your location services are enabled.
New Spot: Virtual Staff Gauge (Water Level)
Attention: This category used to be called “water level” and was renamed in April 2020. The functionality remains exactly the same as with the old category.
Starting a new VIRTUAL STAFF GAUGE spot is easy. All you have to do is find a nice spot along the river, that people can reach easily, without being in danger of falling into the water! Make sure that you have the GPS enabled in the settings of your phone (outside the app), so that the app can access it.
After pressing the ADD SPOT button:
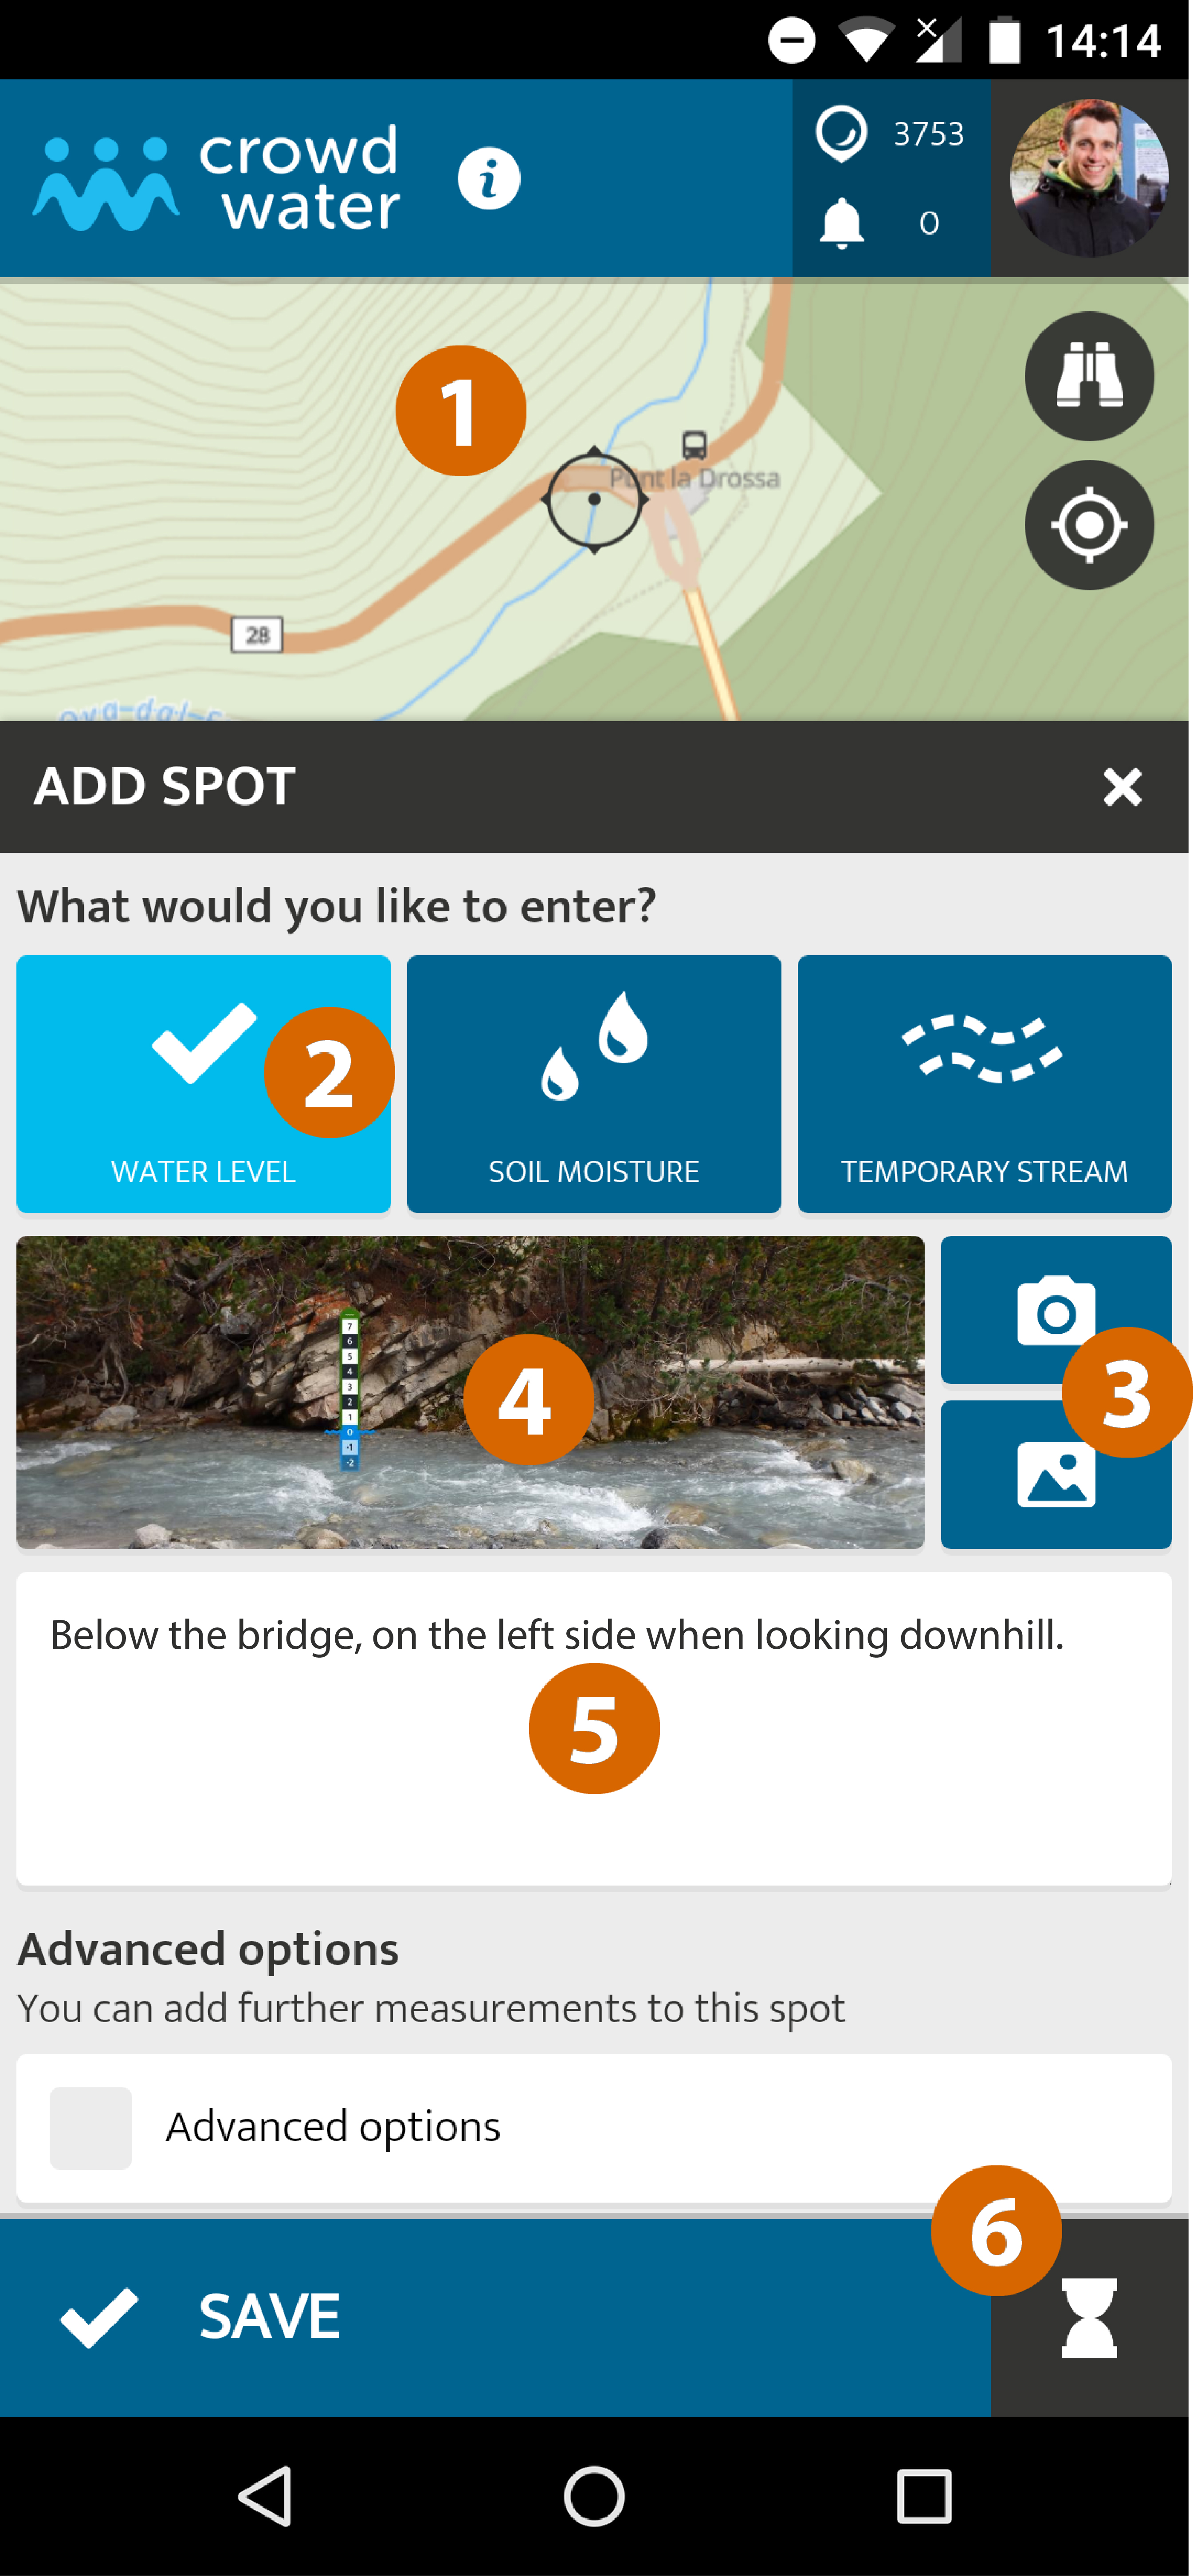
 Make sure the coordinates are correct. Otherwise drag the map to your location.
 Select VIRTUAL STAFF GAUGE.
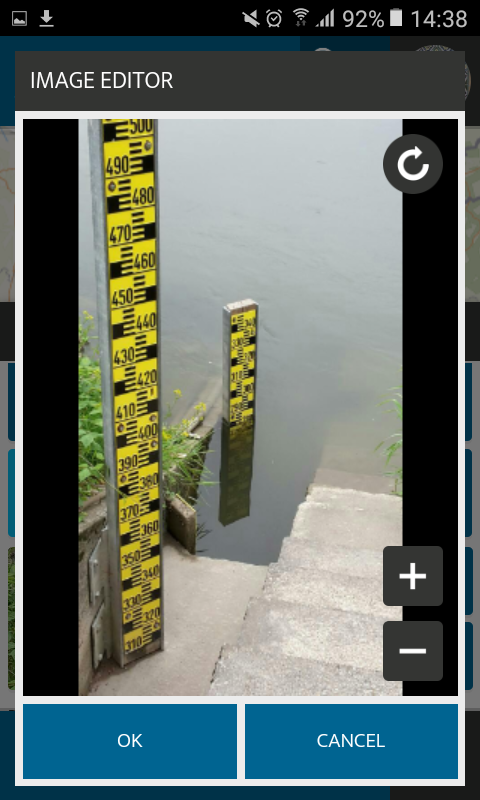
 Take a new photo or select one that you have taken before from your album. Ideally there will be some kind of structure or something that other users can use as a reference for the water level measurement in the picture. Try looking for big boulders in the river, a wall on the opposite side of the river, bridge pillars or anything else that will most likely not move in the near future and catches your eye. Important: the photo of the location has to be taken perpendicular, i.e. in a 90° angle to the river flow direction, facing the opposite river bank! Once you have taken the picture, the image editor opens up and you can insert the staff gauge.
 Once you have taken the picture, the image editor opens up and you can insert the staff gauge. Take a look at this video to get an impression how this might look like.
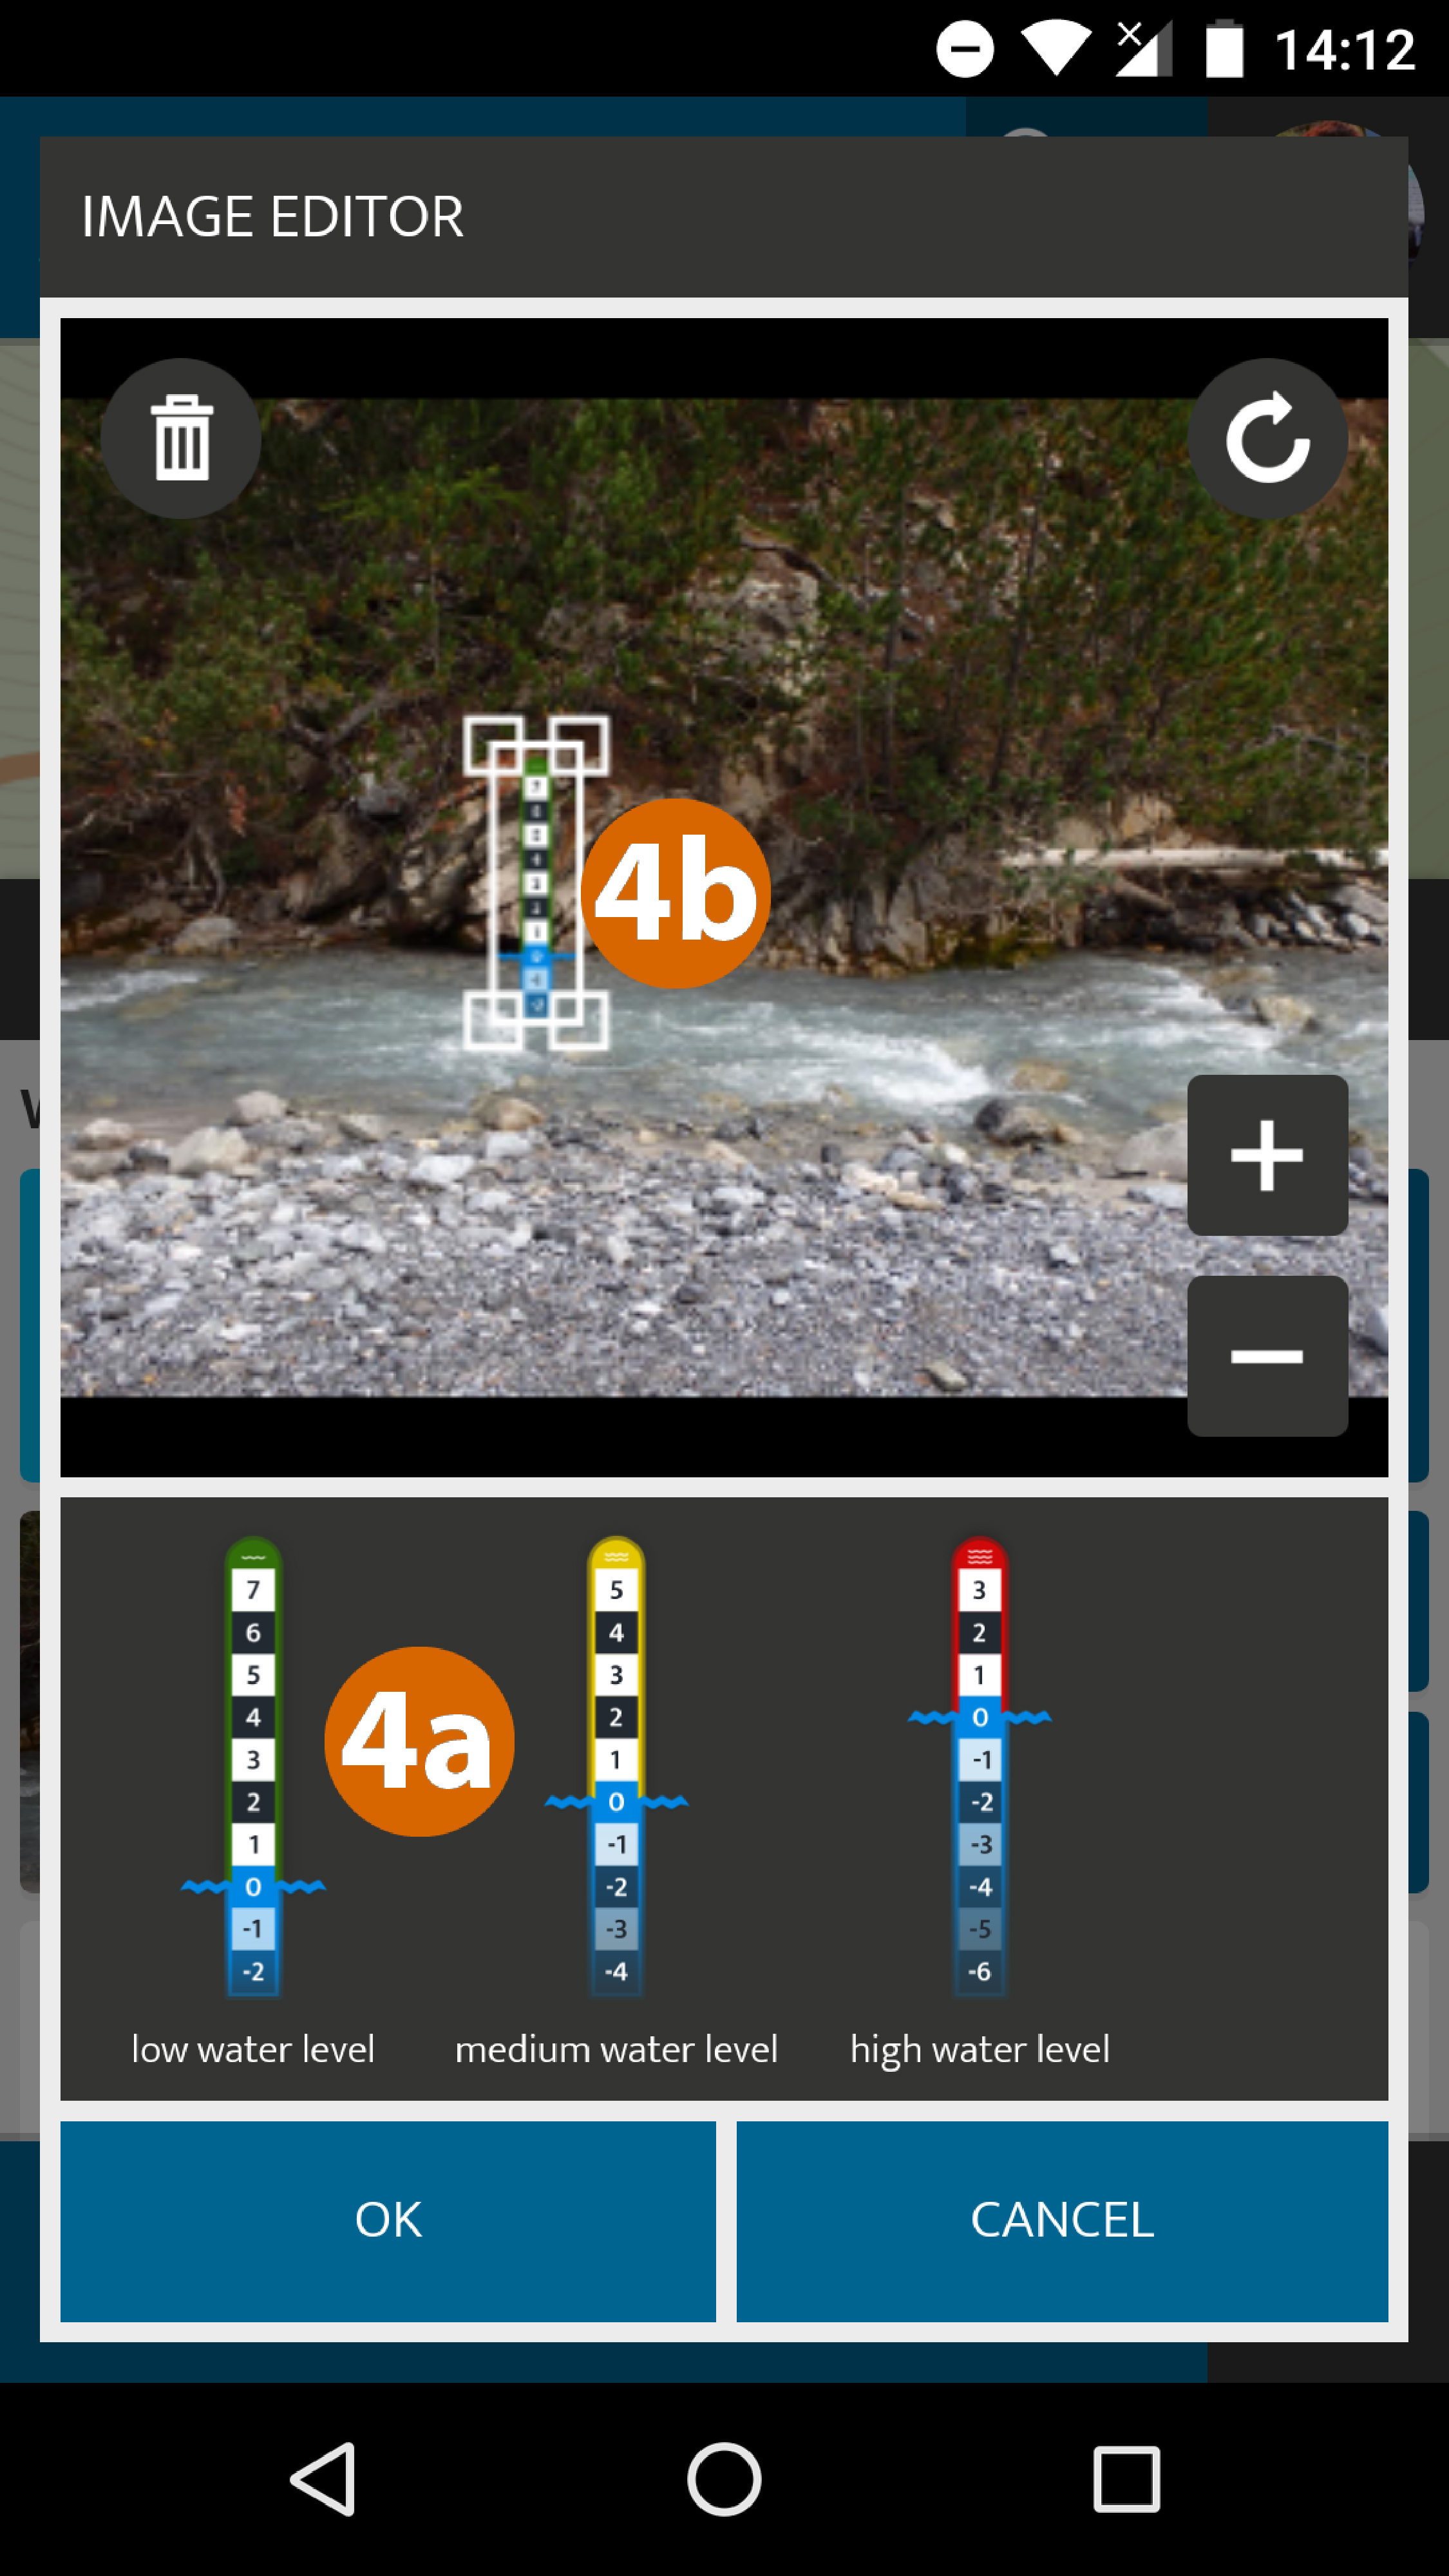
 You have three different staff gauges. Before you choose try to decide if the river is currently at low, medium or high flow. Choose the corresponding staff gauge from the bottom of the image editor. If you are in doubt, just choose the yellow (middle) staff gauge.
 Insert the staff gauge. Adjust its size with two fingers and location with one finger, so that zero is at the current water level and the bottom is more or less at the bottom of the river (or at least deep as deep as the river during very low flow) and the top should be roughly at the top of the river bank (or as high as the river during a flood).
 In the comment field you can describe the spot. Tell the others, how they can find the spot and the exact location from where you took the picture.
 You can then either click on SAVE to register the spot, or continue by scrolling down to advanced options and estimate the streamflow at the current spot (see section: Streamflow Estimation).
New Spot: Physical Staff Gauge (Water Level)
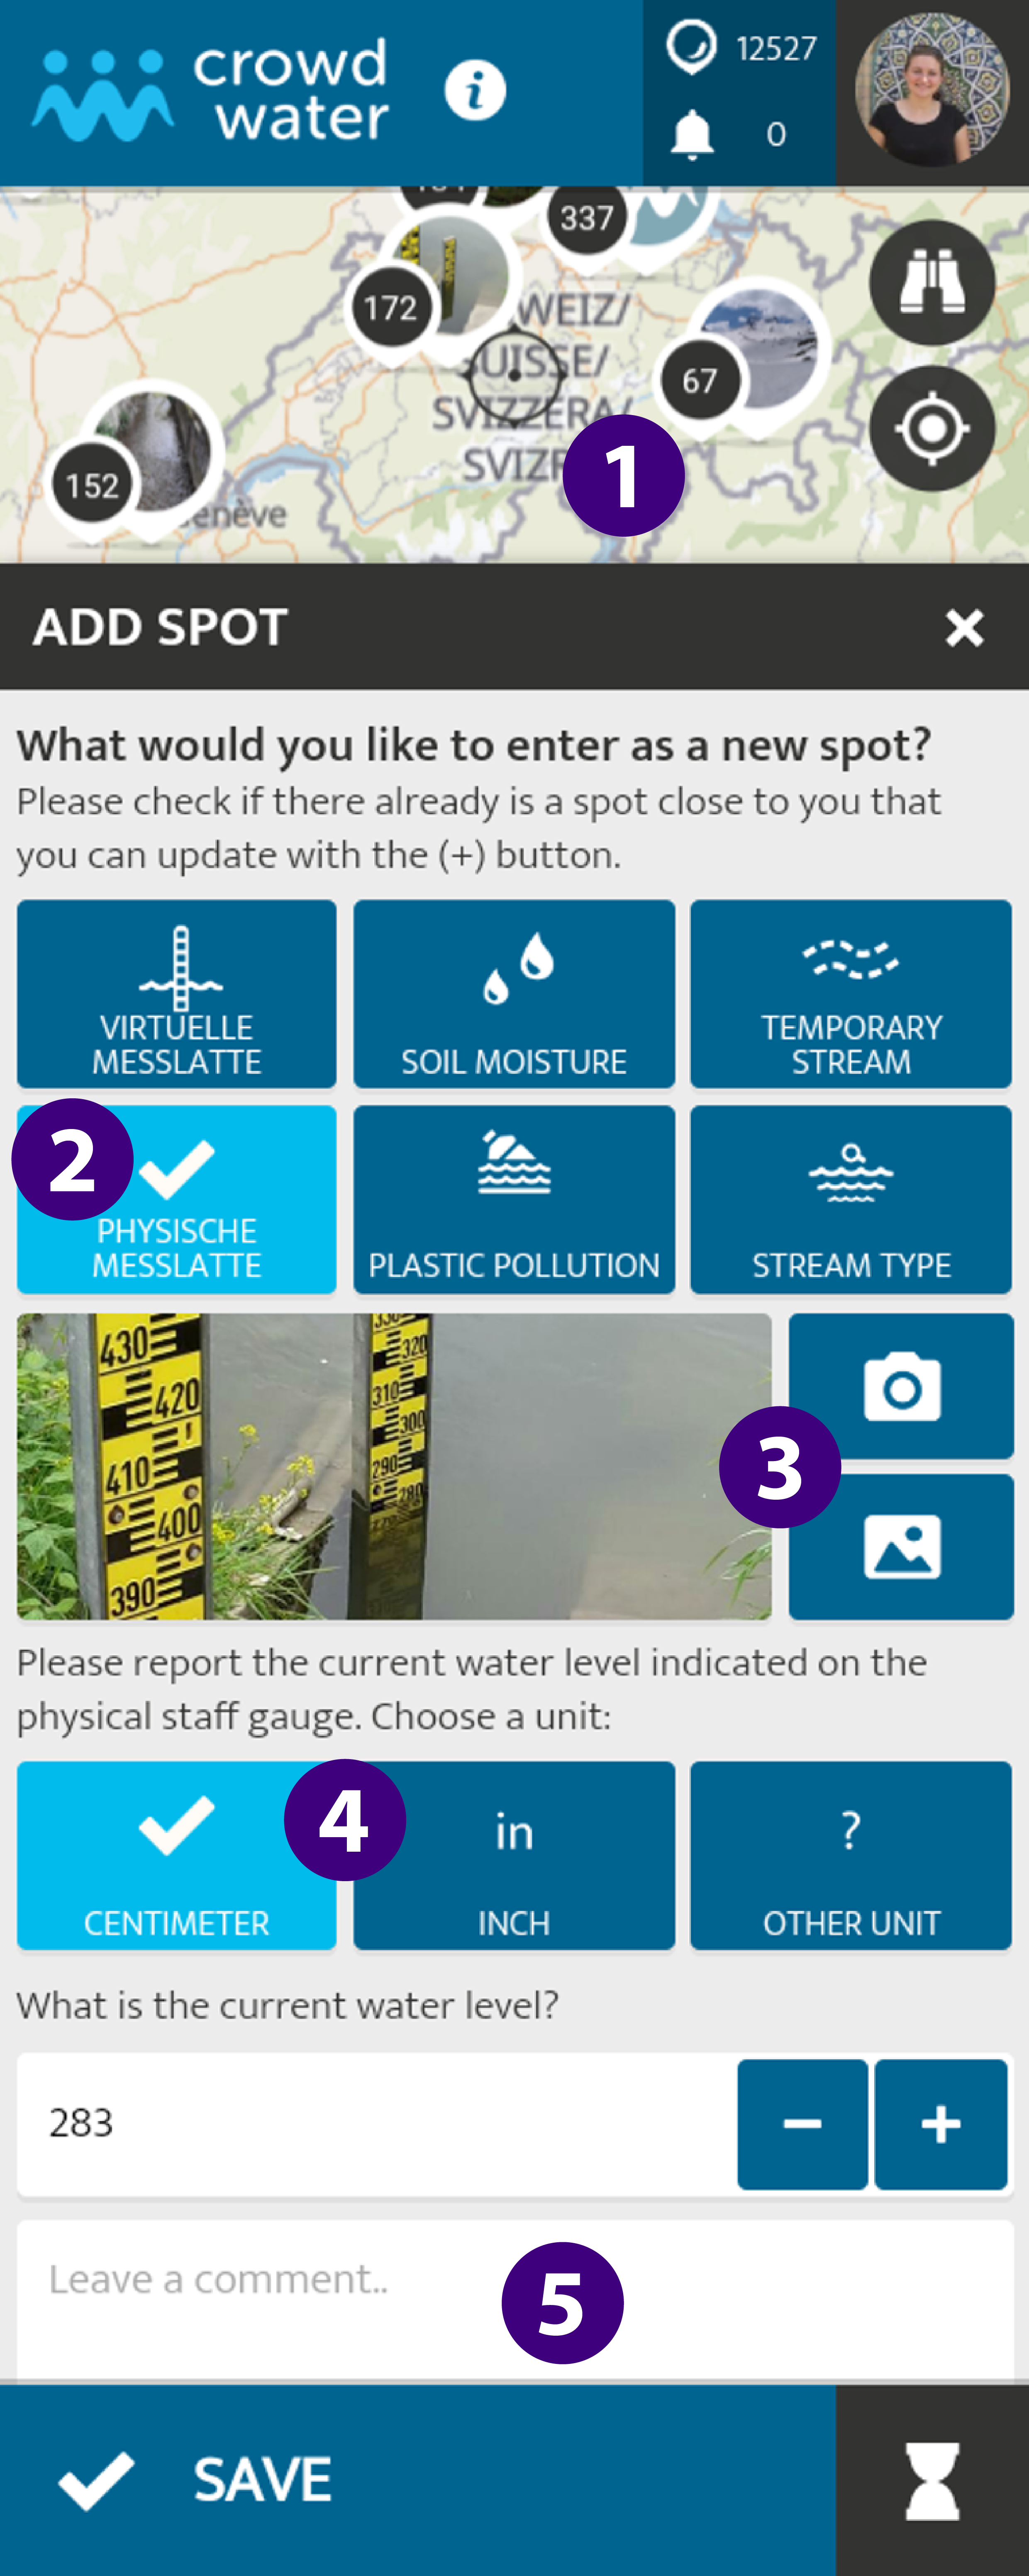
 Make sure the coordinates are correct. Otherwise drag the map to your location.
 Select PHYSICAL STAFF GAUGE.
 Take a new picture or choose one from your album. The picture should the physical staff gauge and the current water level. If possible it would be good if the water level can also be read from the staff gauge on the picture.
 Now you need to choose the unit which is shown on the staff gauge and to enter the water level in the field below.
 In the comment field, there is place for your remarks. Don’t forget to save your spot in the end.
New measurement: All you need to do is select an existing spot, click on the plus sign (see Spot Update) and then repeat the necessary steps.
New Spot: Soil Moisture
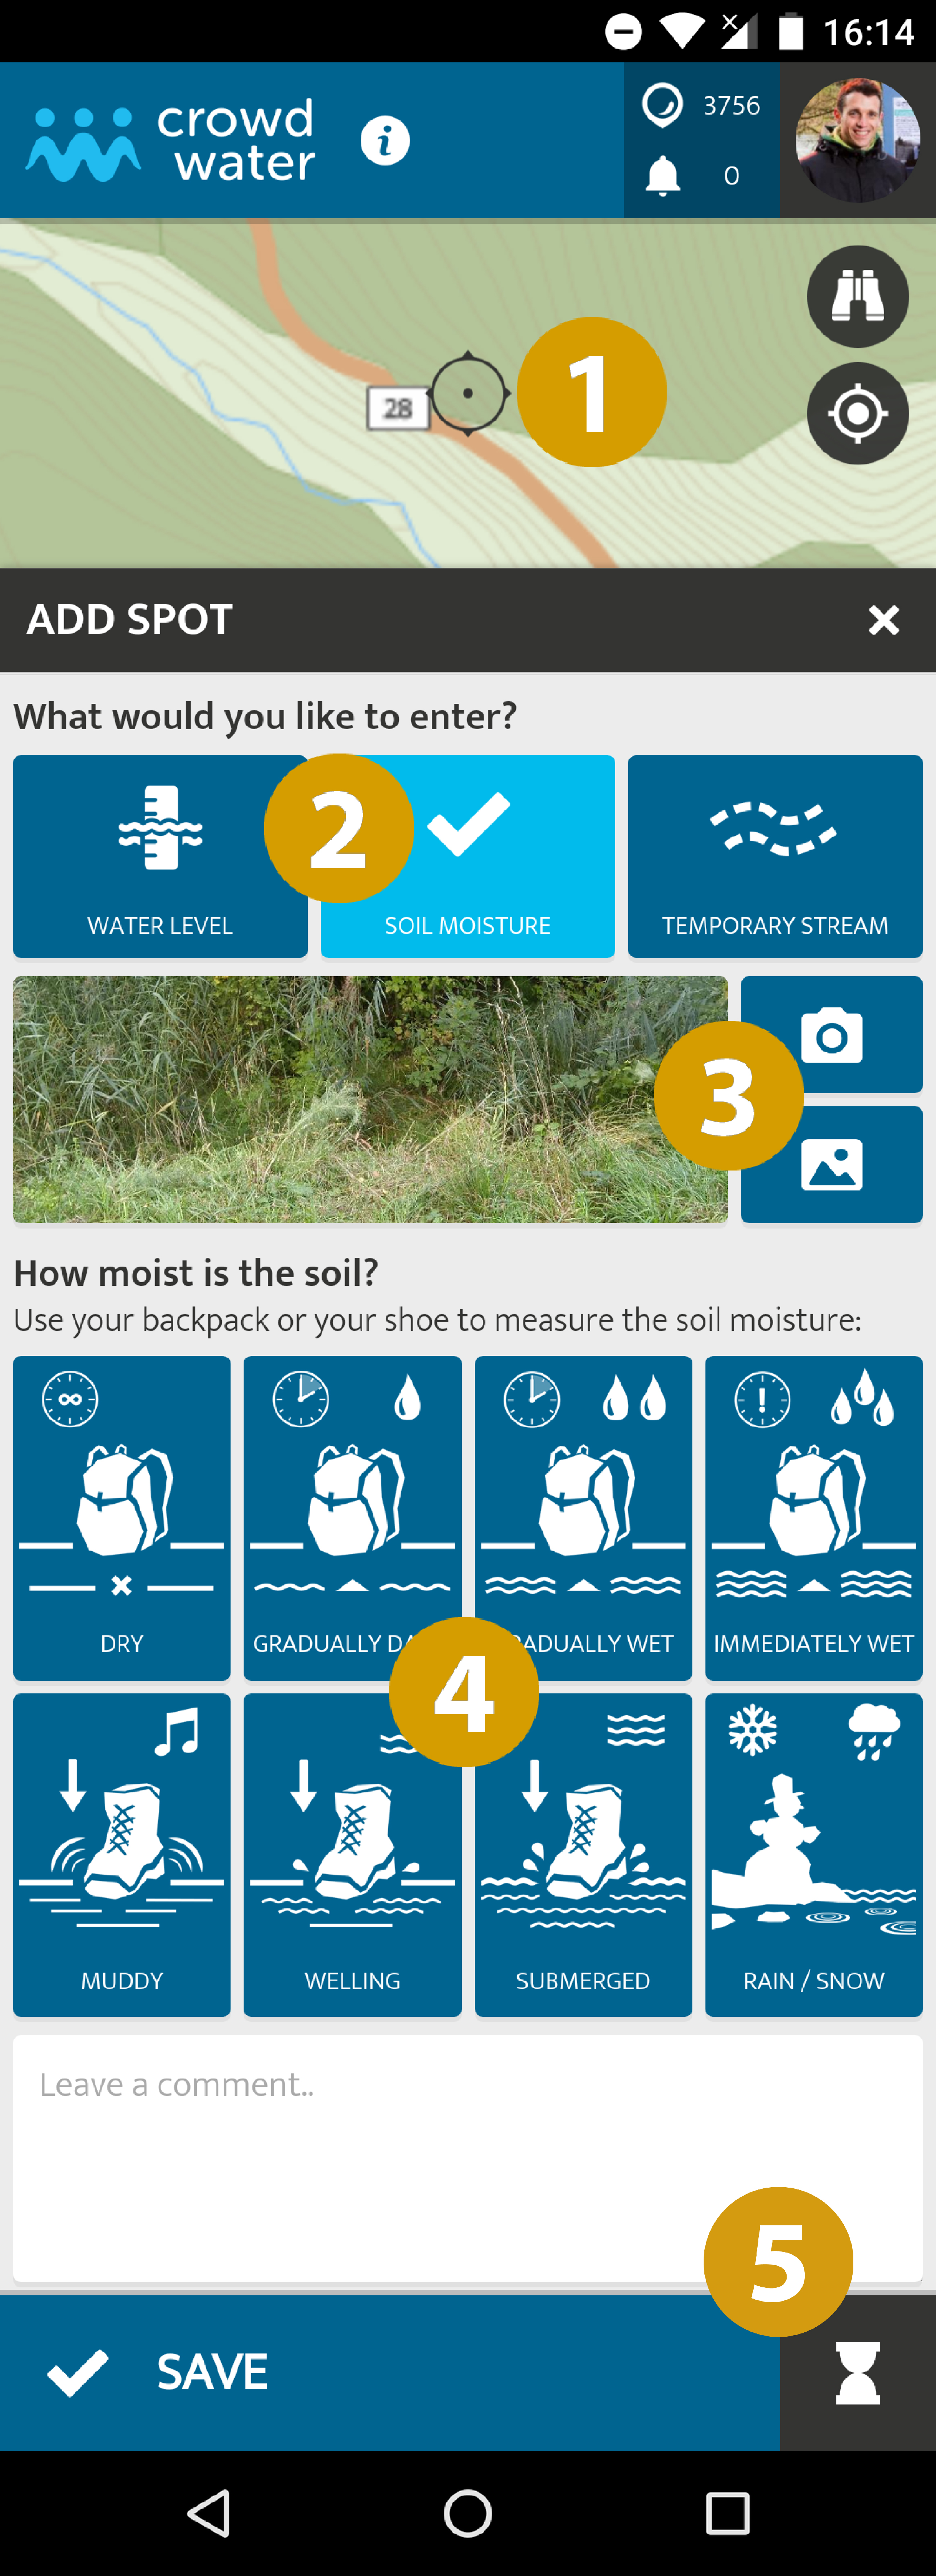
 Make sure the coordinates are correct. Otherwise drag the map to your location.
 Choose SOIL MOISTURE.
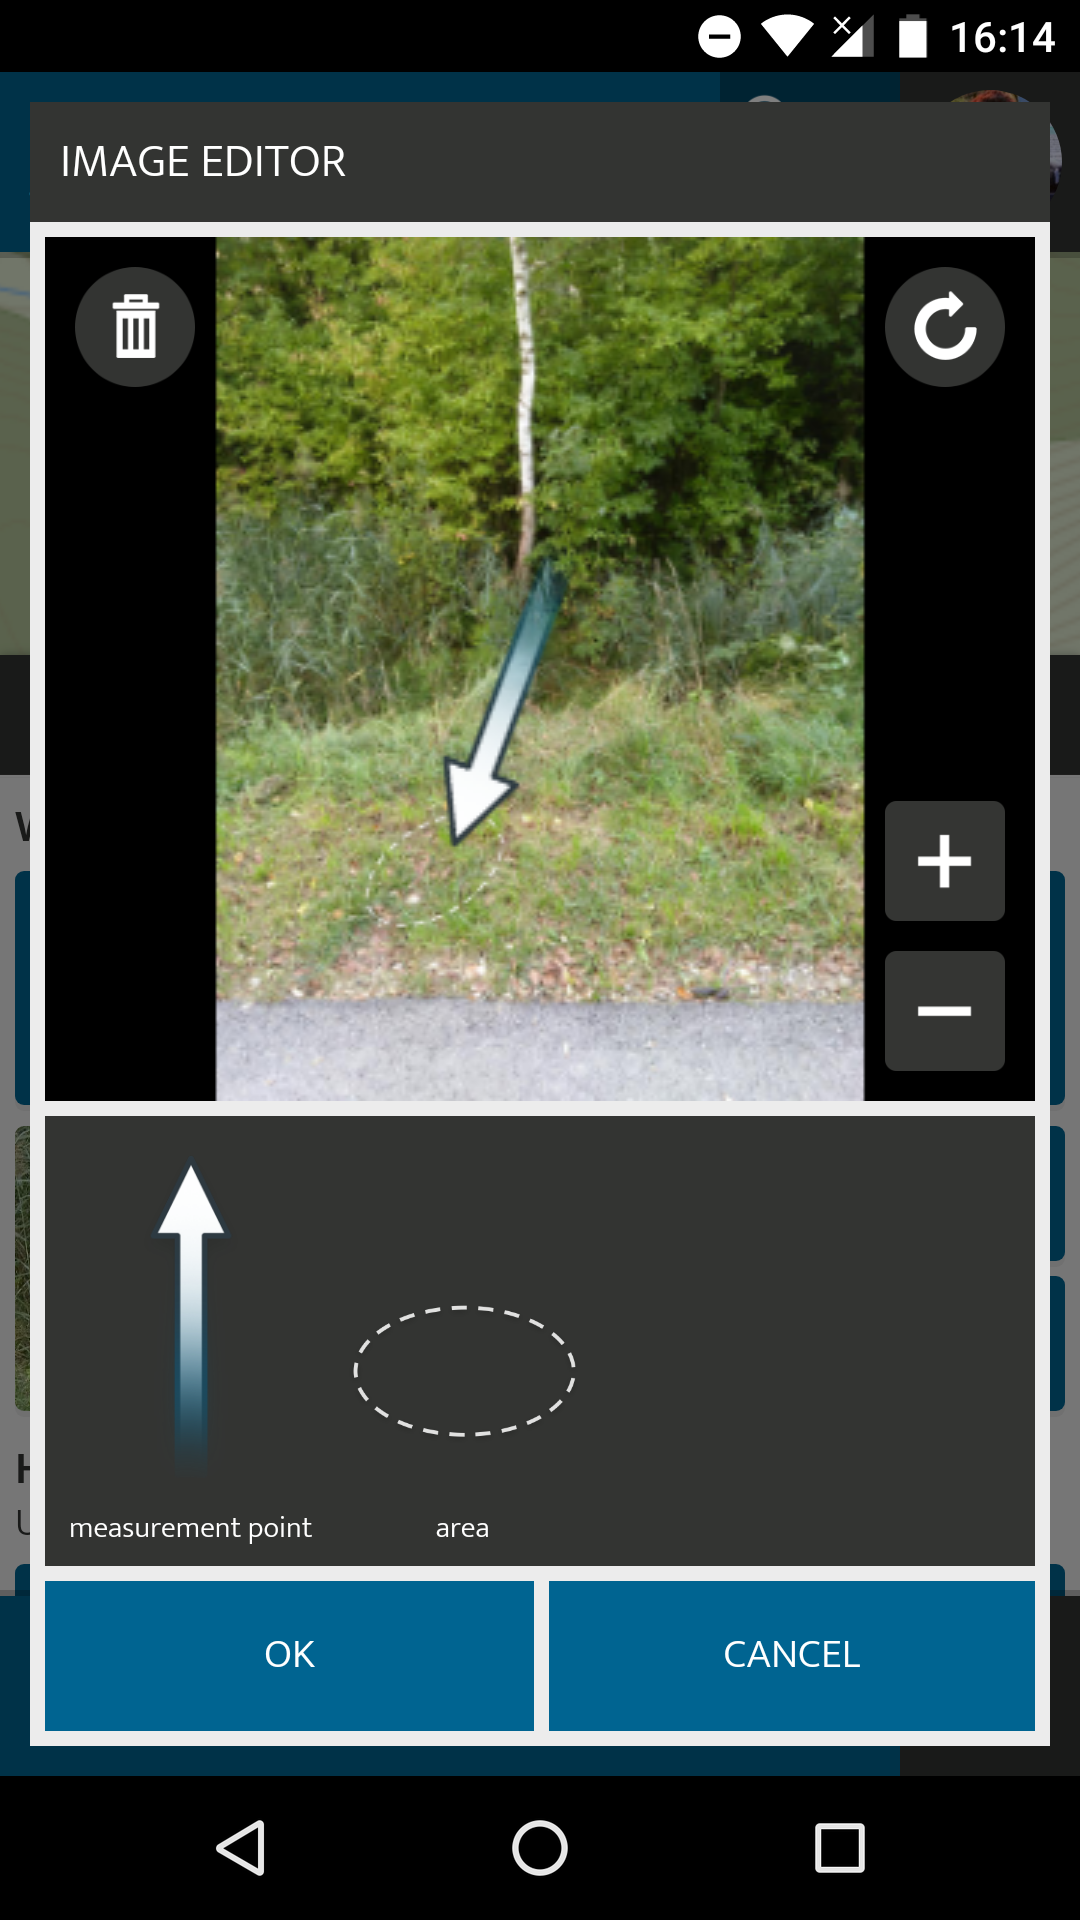
 Take a picture of the site and insert the arrow or circle to indicate the exact location of your measurement in the picture.
 Estimate the soil moisture with your hands or shoes. Image placing a backpack onto the ground, but keep in mind that you don’t actually have to put it there. Just imagine what it would be like, so as not to make your backpack wet. There are eight classes you can choose from:
- DRY: You could set the backpack on the ground and even after a long time, it would still be dry.
- GRADUALLY DAMP: You could set the backpack on the ground and after some time it would slowly get moist.
- GRADUALLY WET: You could set the backpack on the ground and after some time it would slowly get wet.
- IMMEDIATELY WET: You could set the backpack on the ground and it would immediately get wet.
- MUDDY: If you were to step on the ground you could hear a squeaky sound from the wet soil.
- WELLING: If you were to step on the ground you could see water coming out of the ground next to your shoe.
- SUBMERGED: There is water on the surface before you step on it.
- RAIN/SNOW: There is snow on the surface or it is currently raining – this means you cannot do a measurement.
 You can then also enter a site description, so the next user can find the location more easily. Upload your contribution by clicking SAVE.
New measurement: All you need to do is select an existing spot, click on the plus sign (see Spot Update) and then repeat steps ![]() and
and ![]() .
.
New Spot: Temporary Stream
For adding a new Temporary Stream-Spot find a stream that occasionally runs dry.
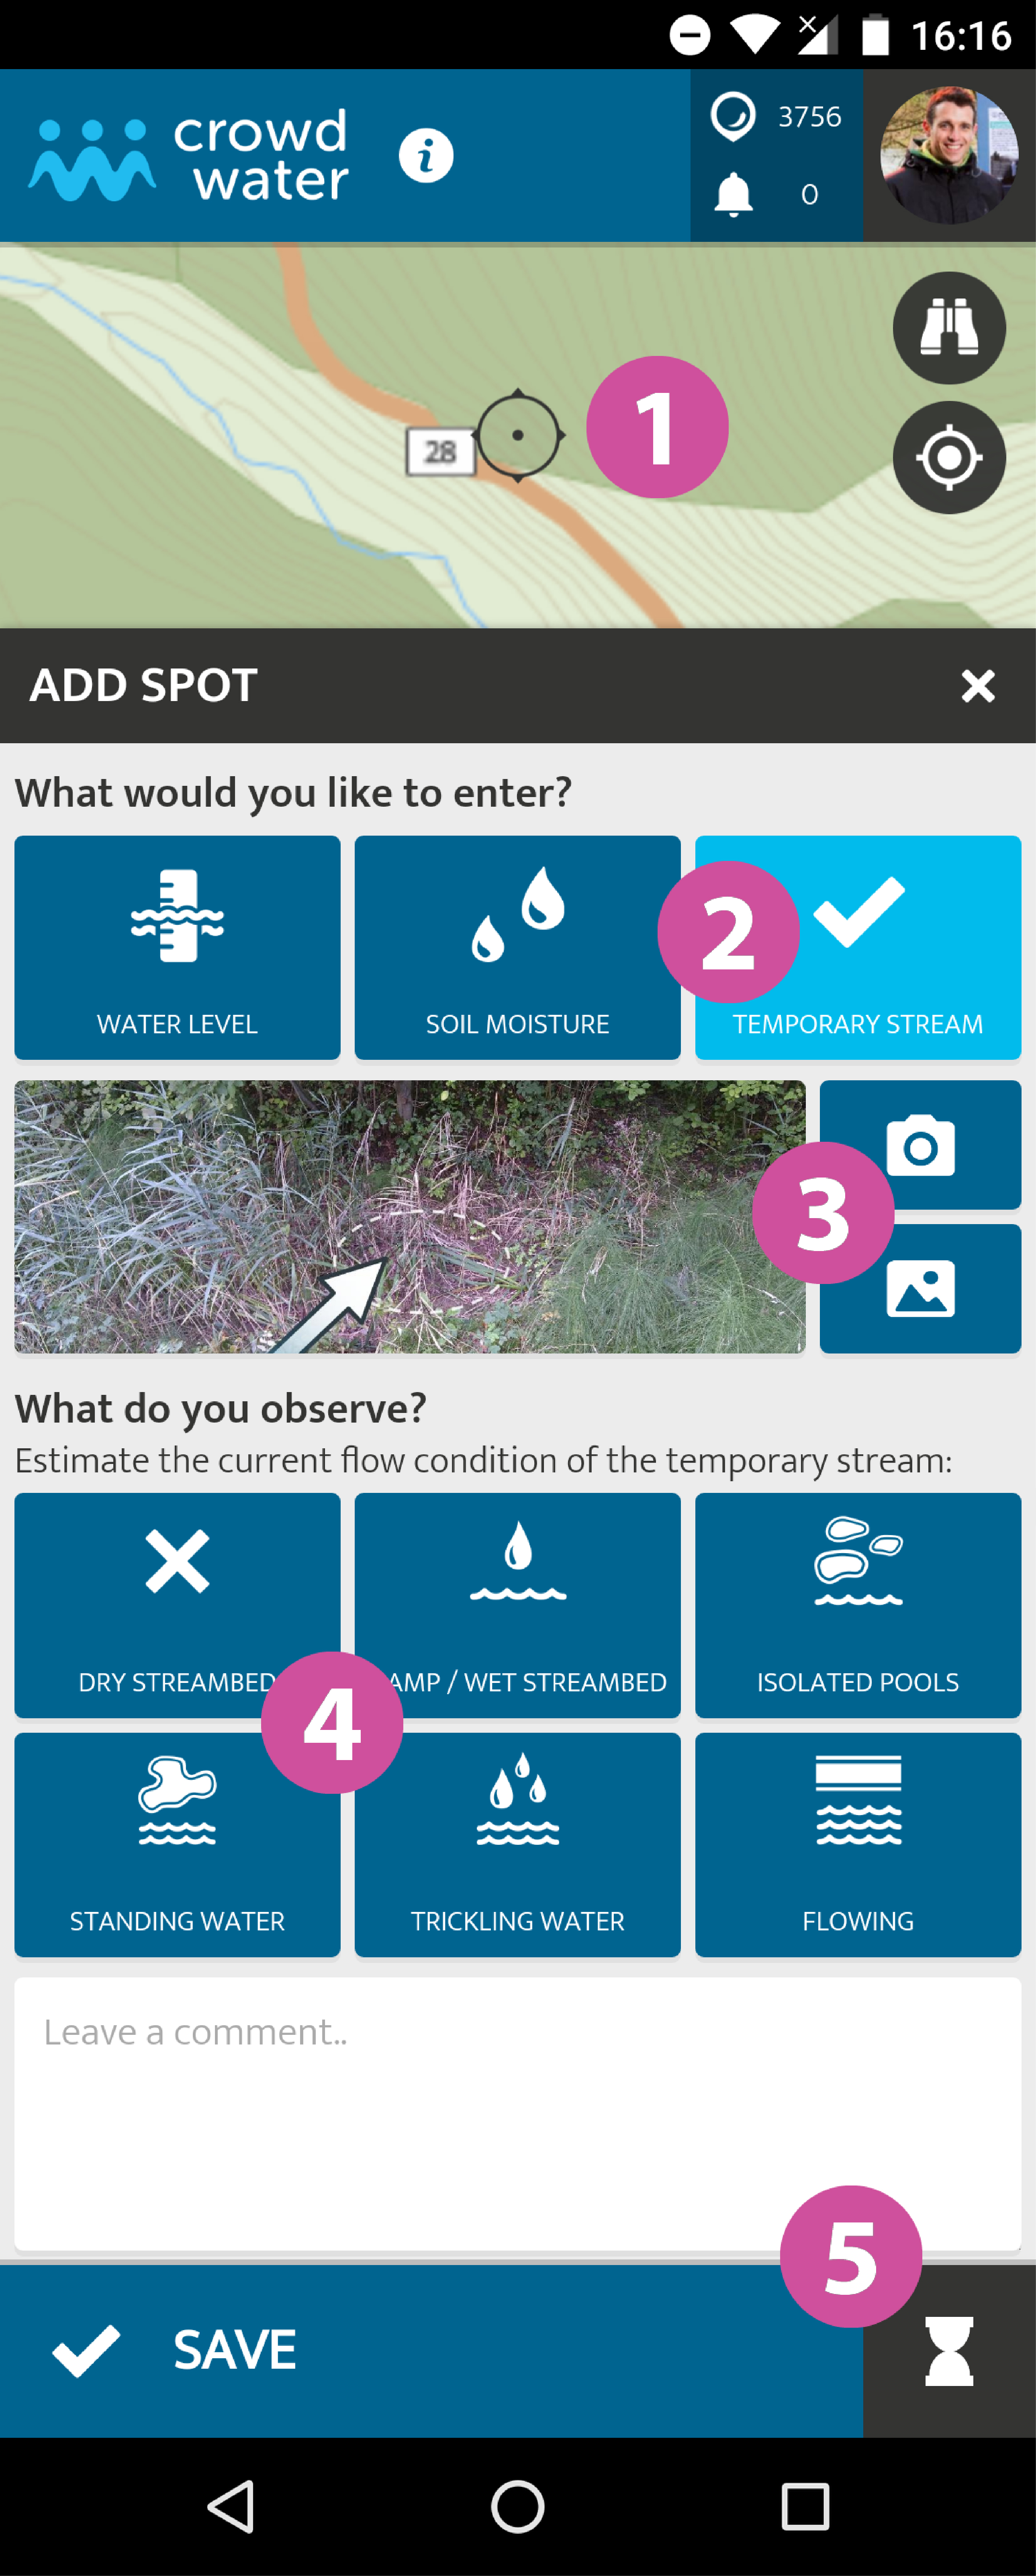
 Make sure the coordinates are correct. Otherwise drag the map to your location.
 Select TEMPORARY STREAM.
 Take a picture of the site and mark the location your observations refers to using the arrow and the circle in the Image-Editor in
 ![]()
 How would you characterize the flow of the stream? How much water is flowing at the moment? Choose one of the six categories below:
- DRY STREAMBED: no visible water and the streambed is dry
- WET STREAMBED: no visible water, but the streambed is wet (for at least 2 cm depth below the surface)
- ISOLATED POOLS: separated pools of water that are not visibly flowing are present on the streambed
- STANDING WATER: water but no visible flow
- TRICKLING WATER: very small flow, but clearly visible flowing water
- FLOWING WATER: a continuous pathway of water that is flowing
 Enter a description of the exact path to the spot, so that the next participants can find it more easily.
New measurement: All you need to do is select an existing spot, click on the plus sign (see Spot Update)) and then repeat steps ![]() and
and ![]() .
.
New Spot: Plastic Pollution
You have two possibilities to track plastic pollution. One is to observe floating plastic on the river and the other one to observe plastic on the shore. Of the steps below, only steps 4 and 5 differ for the two options. Floating plastic is referred to as path A (steps A4 and A5), plastic on the shore as path B (steps B4 and B5).
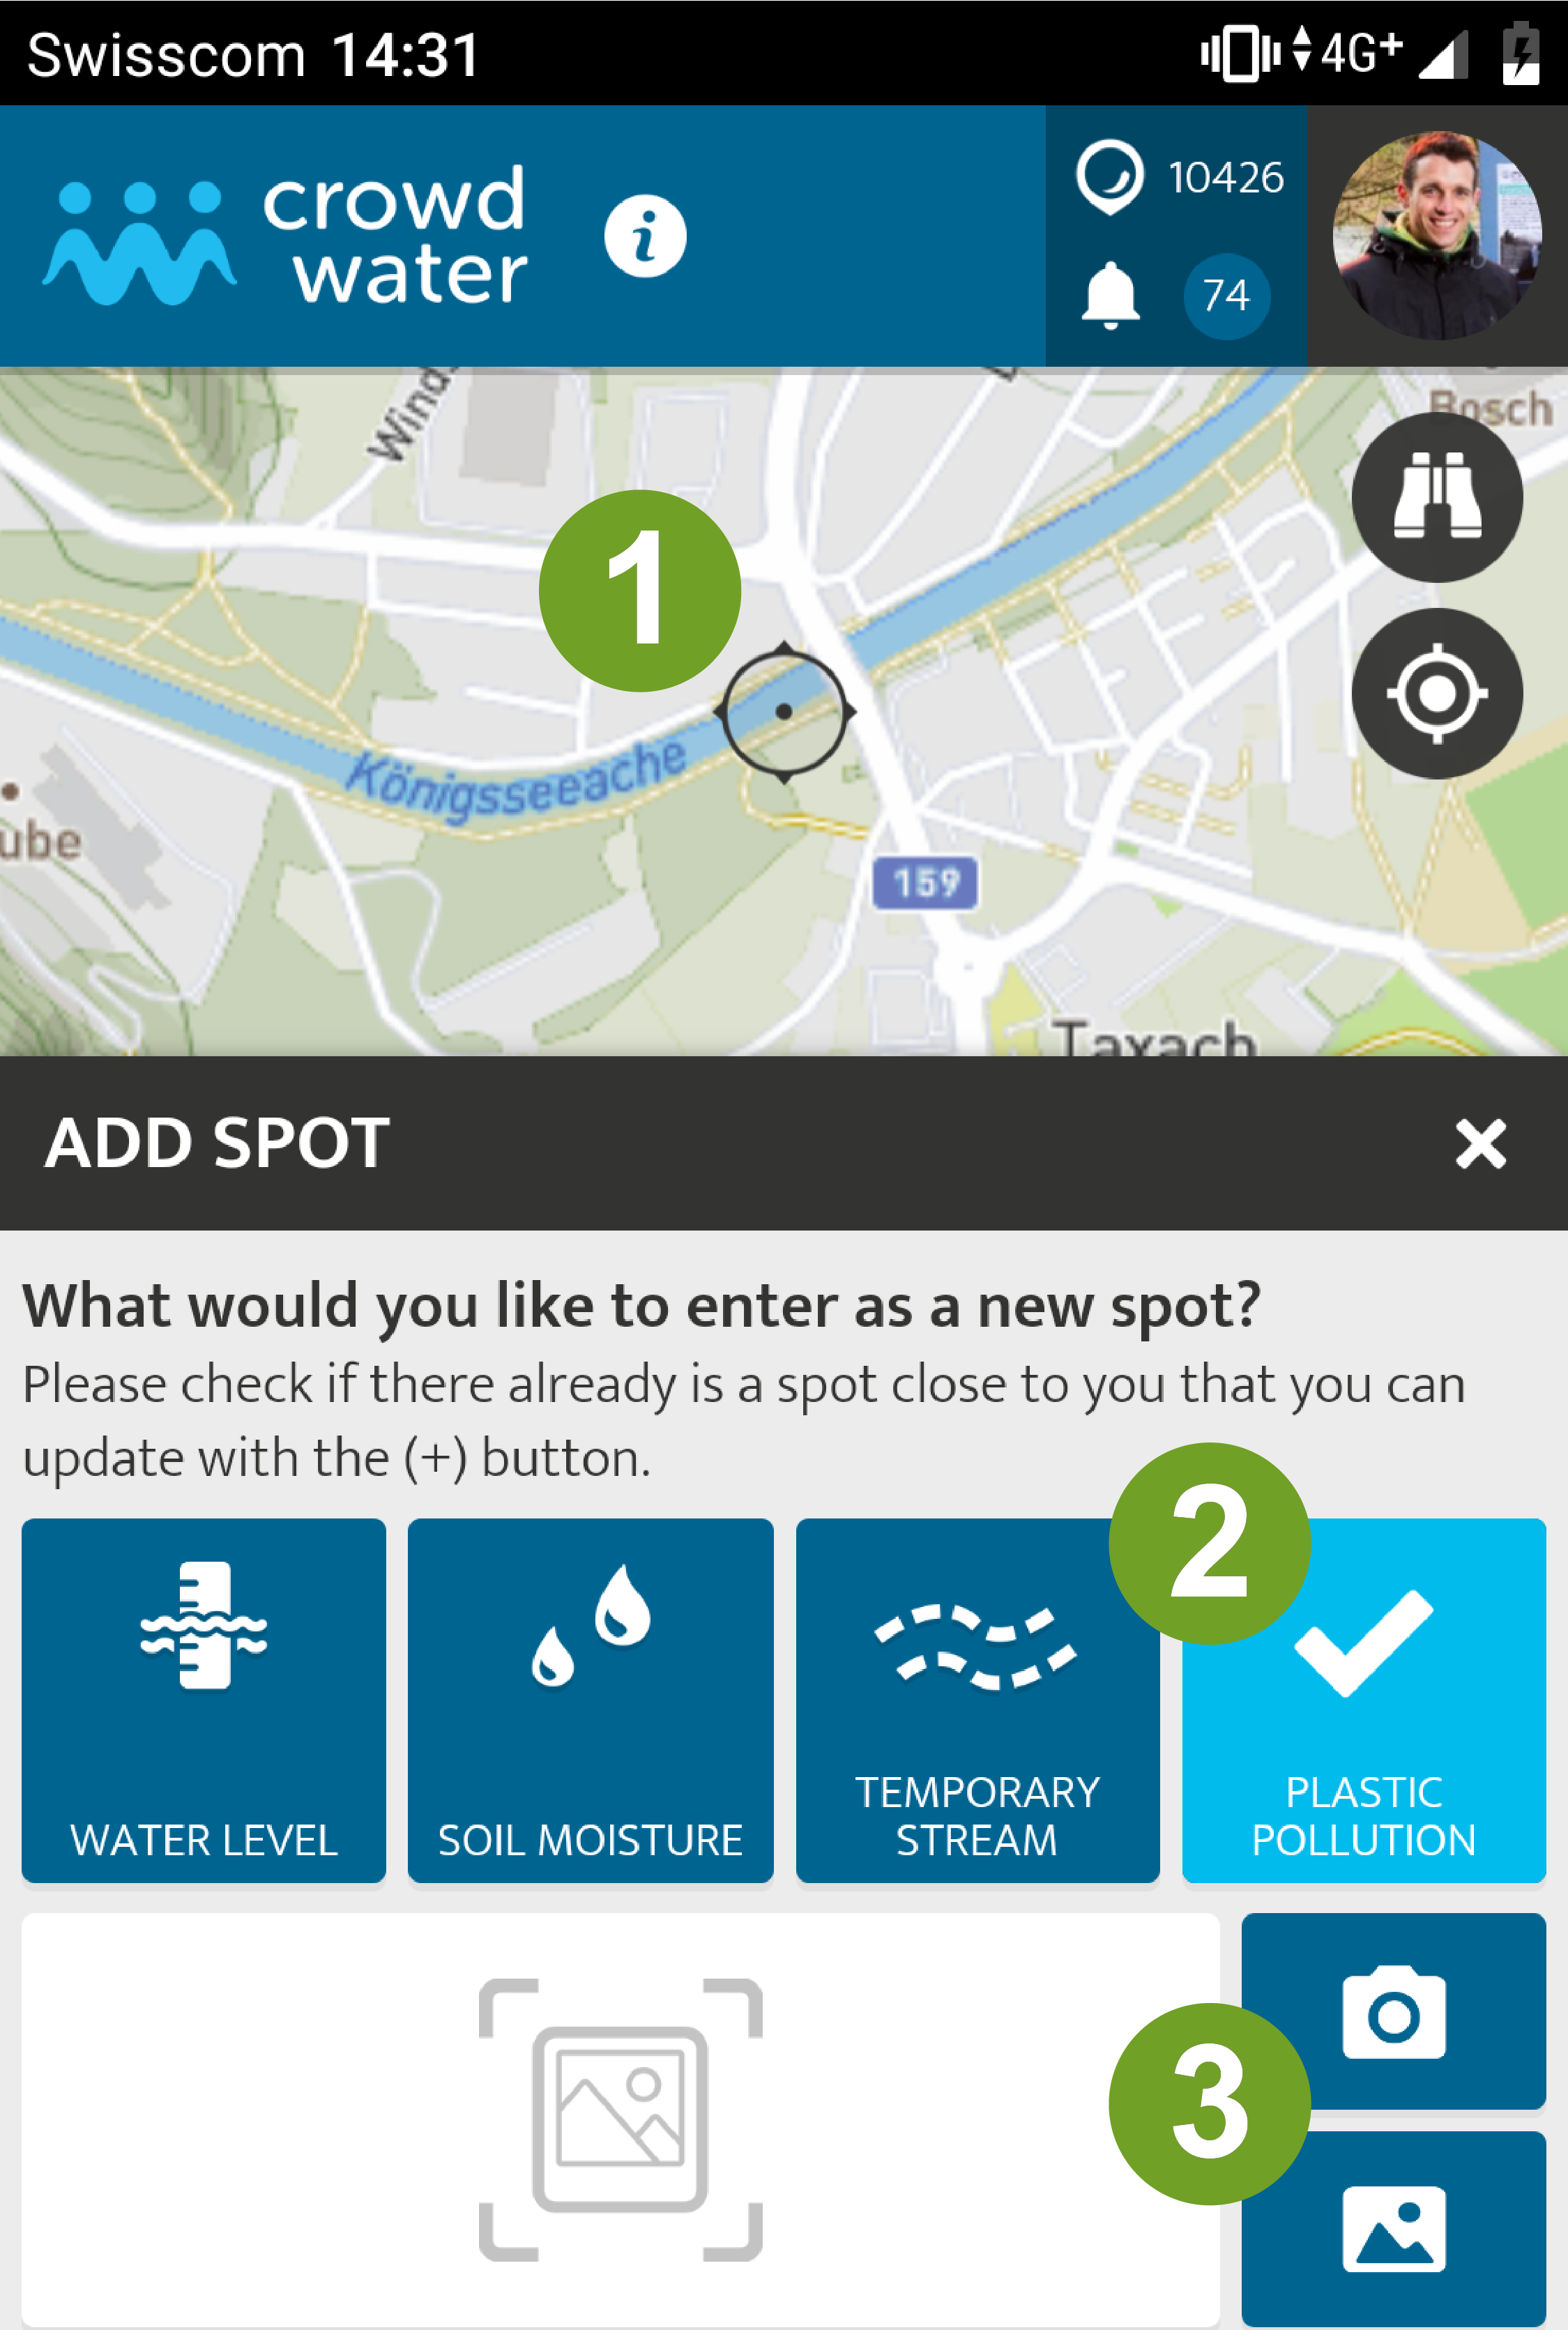
 Make sure the coordinates are correct. Otherwise drag the map to your location.
 Select PLASTIC POLLUTION.
 Take a new picture or choose one from your album. The picture should show where you did the measurement. Maybe you can even show the plastic pieces you saw.
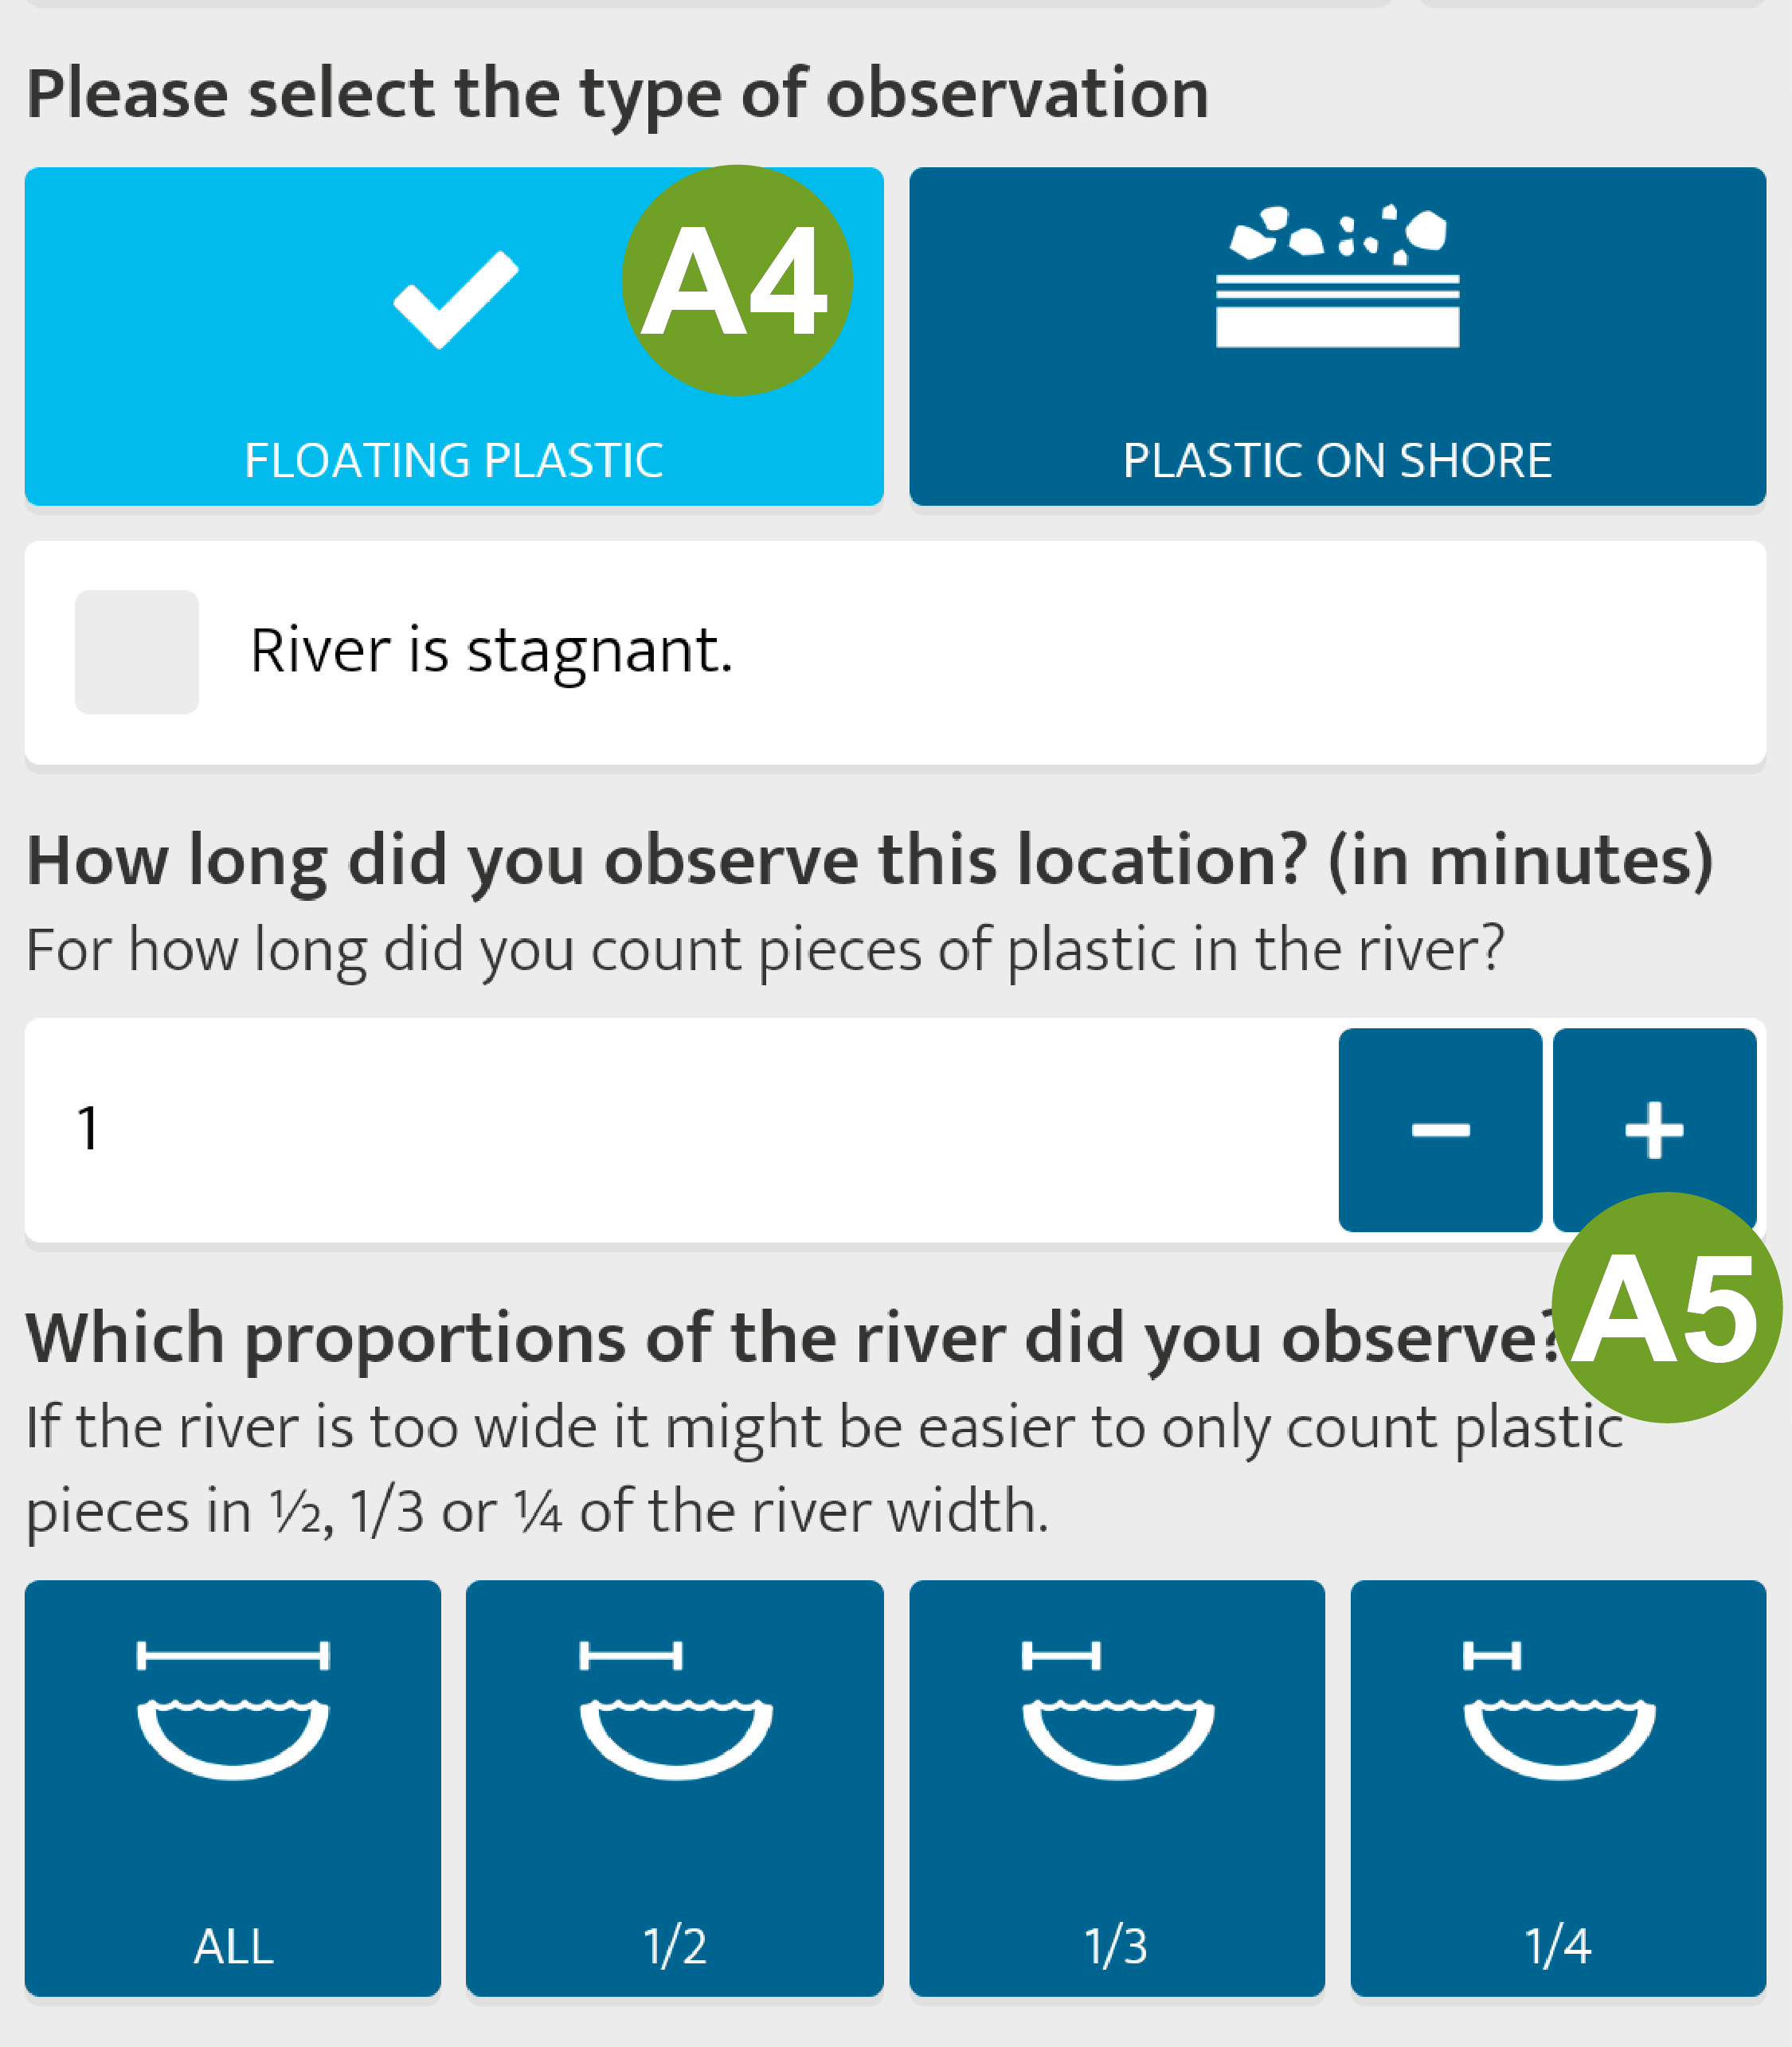
 If you want to count floating plastic pieces, press “floating plastic”. Here you can also make a tick if the river is stagnant.
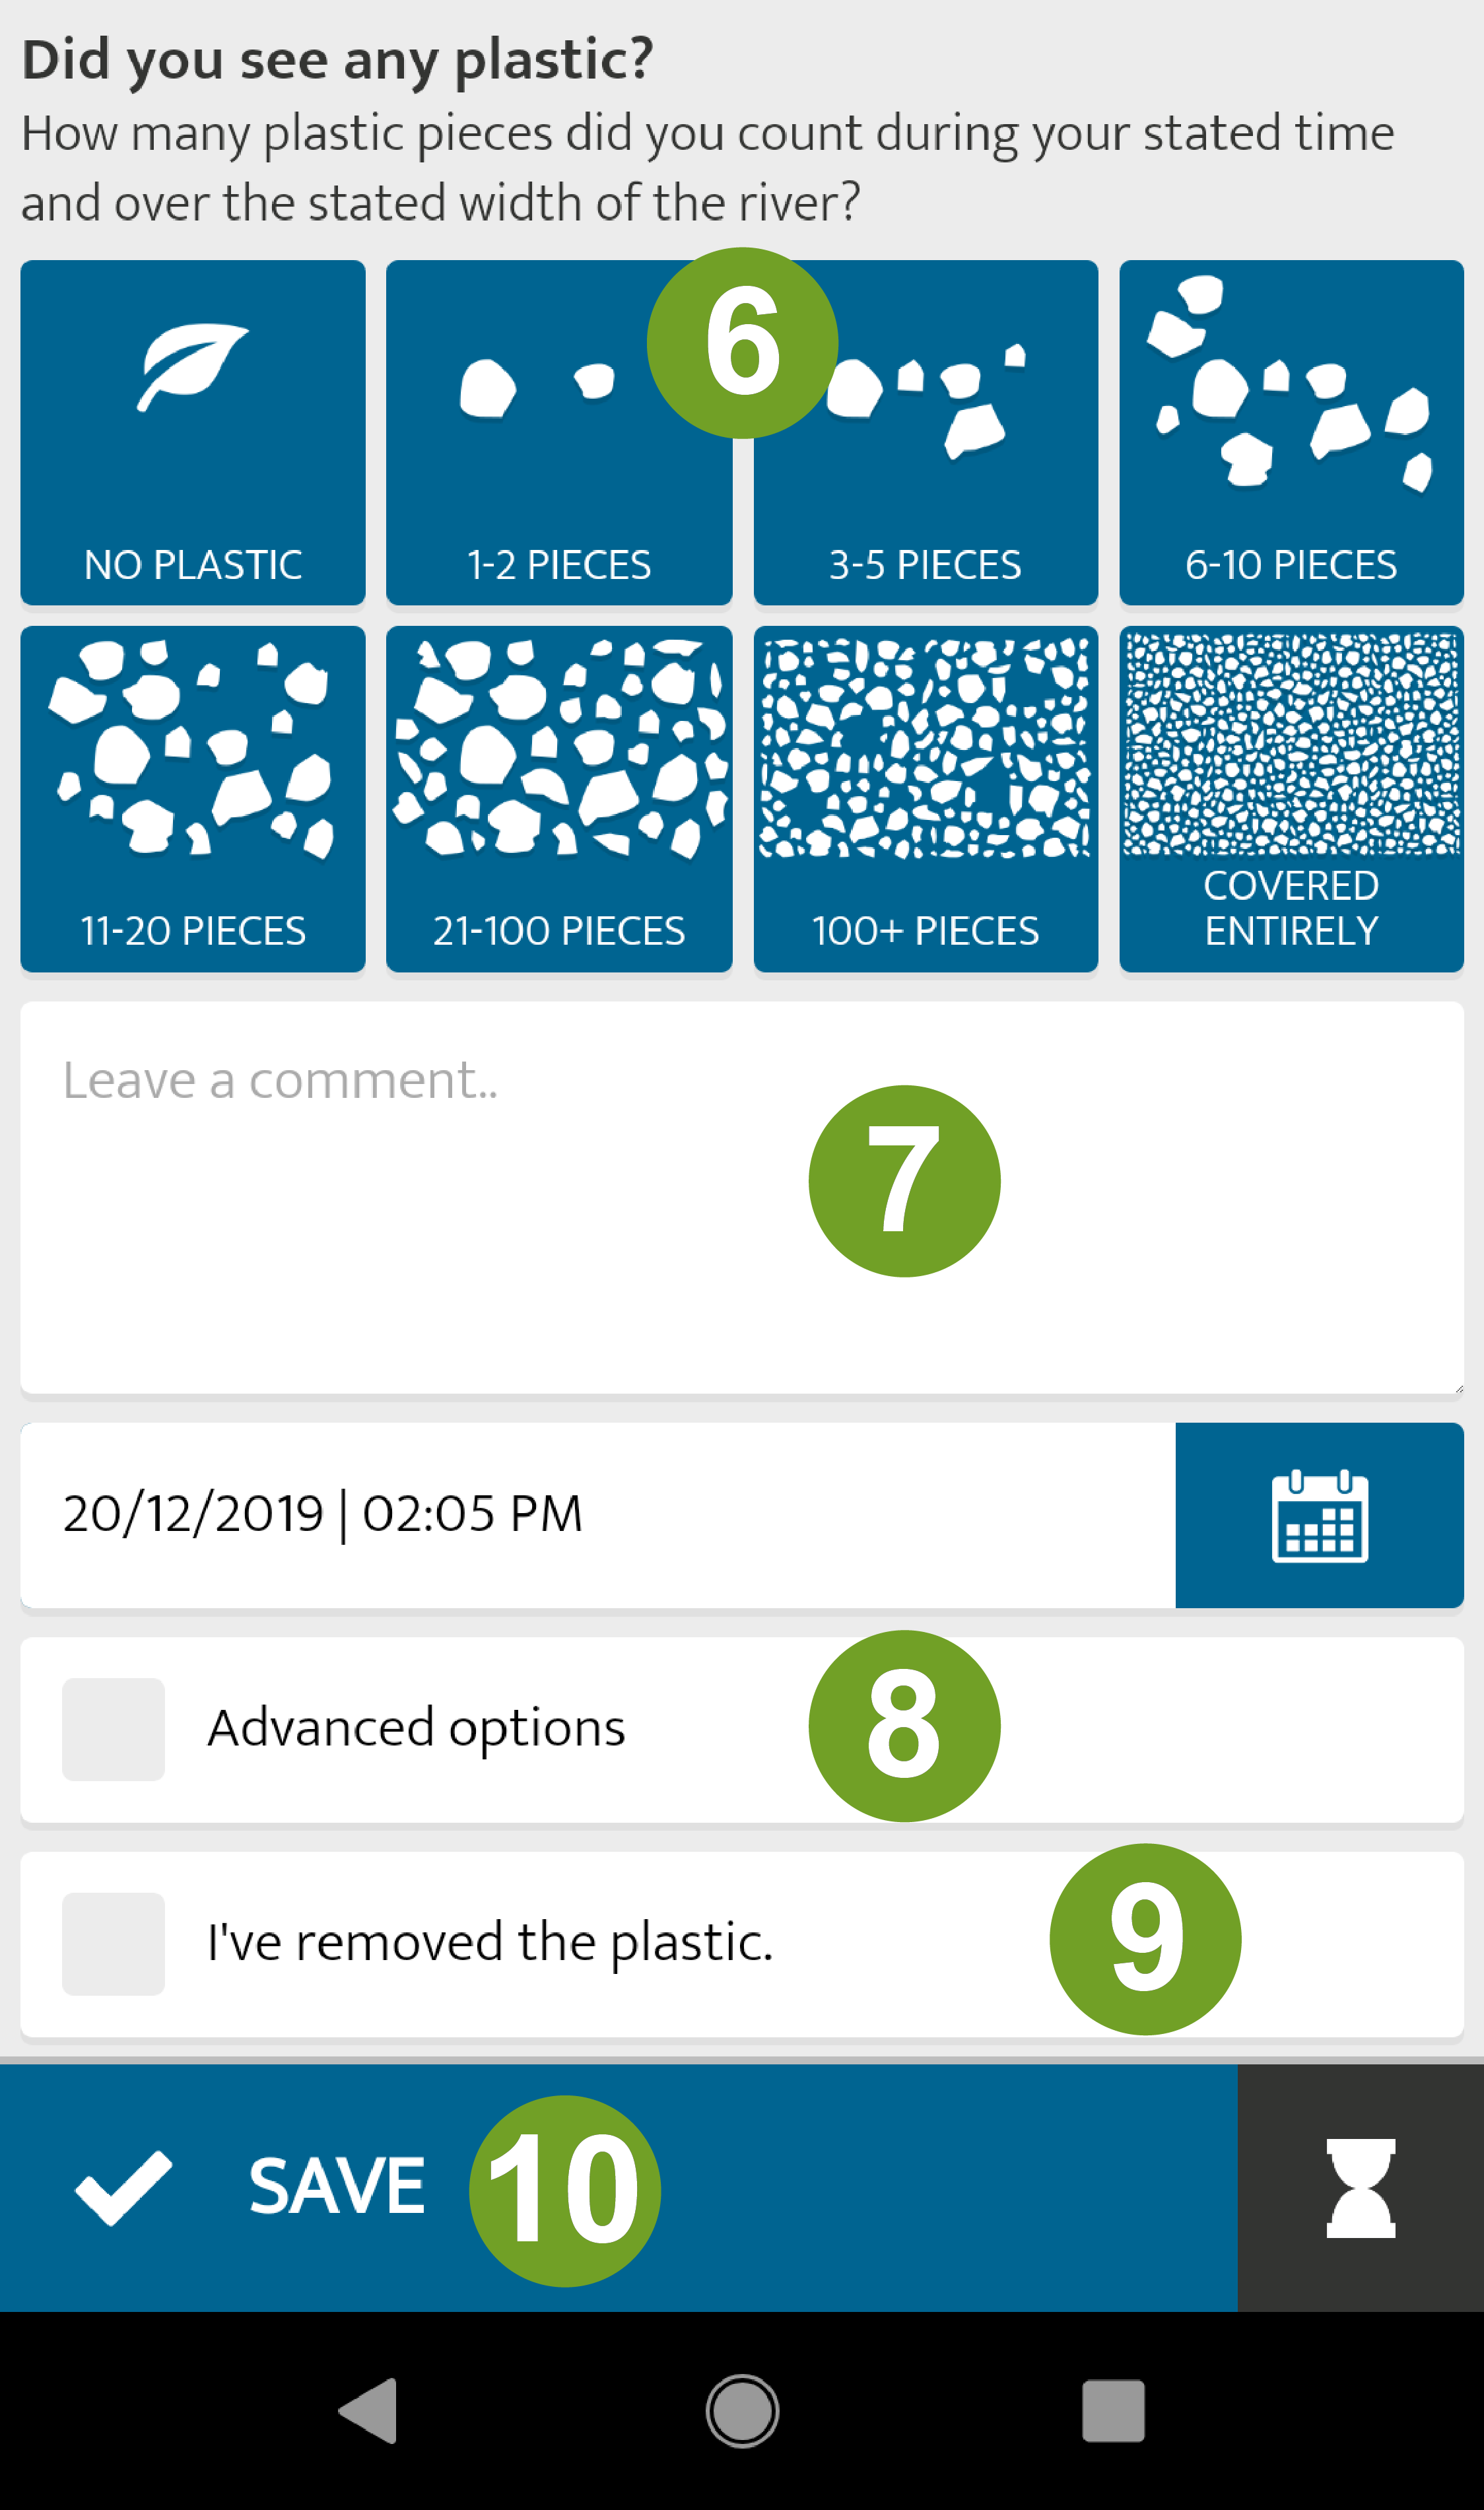
 Write down for how many minutes you were observing plastic pieces (we recommend an observation time of 2 to 15 minutes) and which proportion of the river width you were considering.
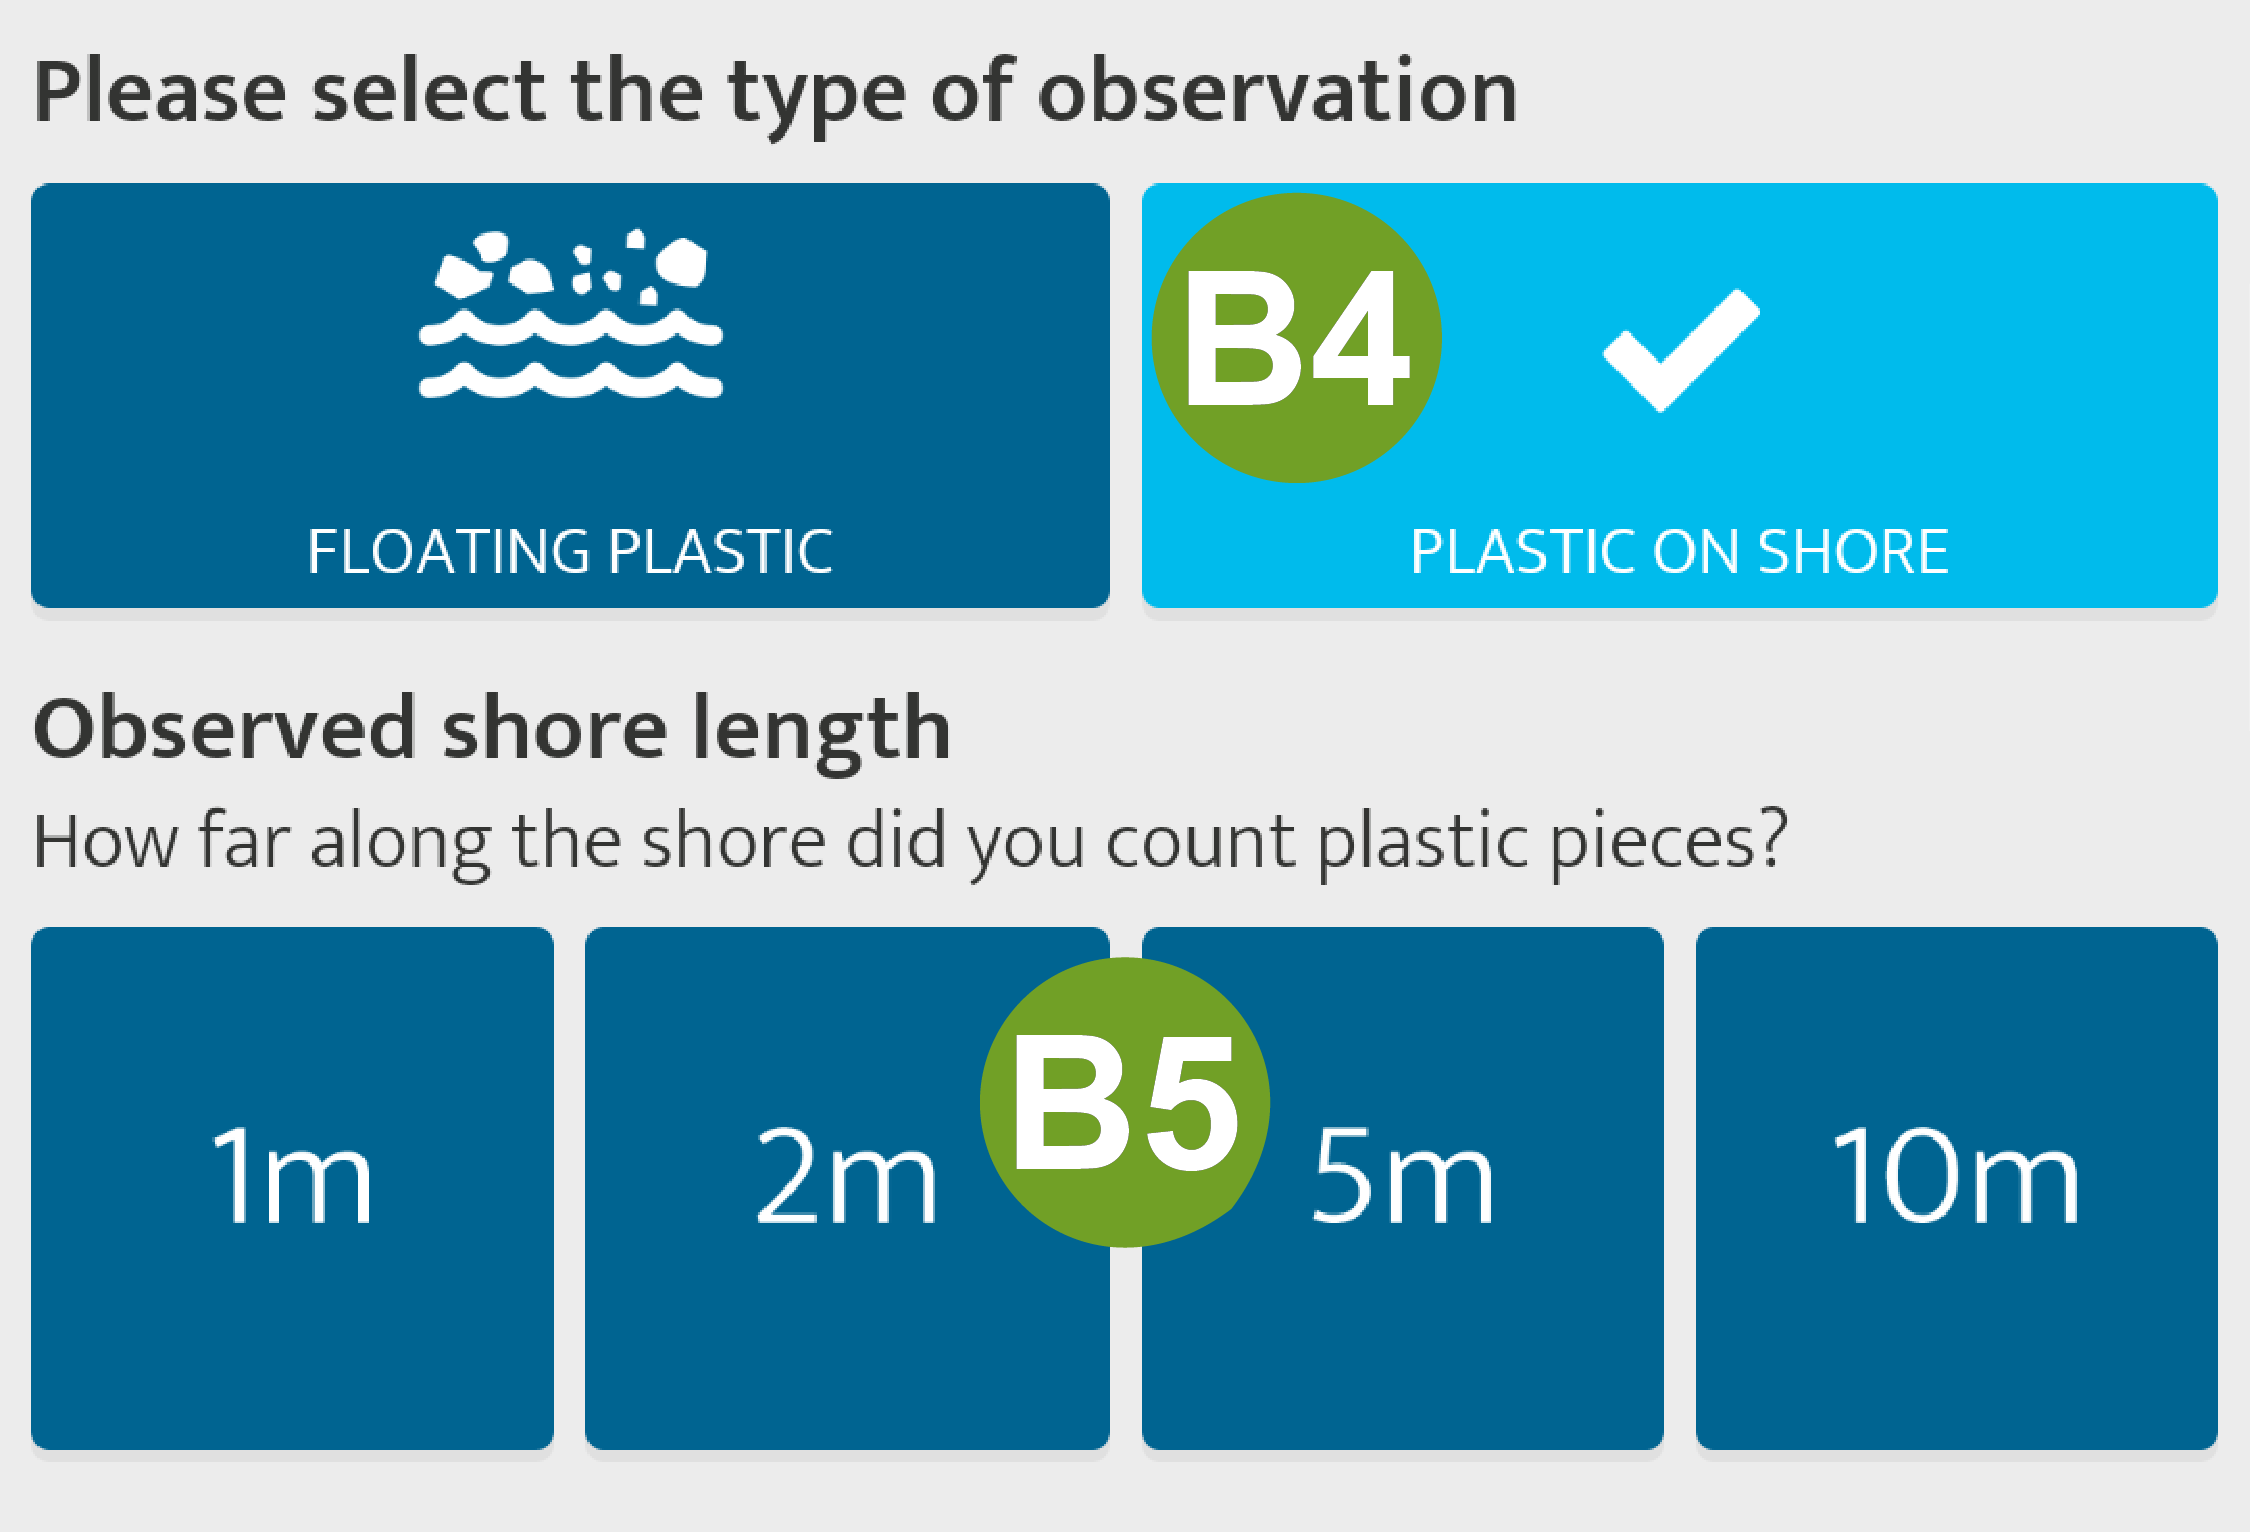
 If you want to count plastic pieces on the shore, press “plastic on shore”.
 Choose the distance along which you counted plastic pieces. The shore-width that you observe should roughly cover the height of the regular water level fluctuations.
 Choose the corresponding button to the amount of plastic pieces you counted.
 Here you can write down comments, for example how to get to your spot. This will make it easier for other users to update your spot.
 If you want to, you can give some more information about the observed type of plastic.
 If you have removed the plastic, put a tick here.
 Do not forget to save your spot.
New measurement: All you need to do is select an existing spot, click on the plus sign (see Spot Update) and then repeat the necessary steps.
New Spot: Stream Type

 Make sure the coordinates are correct. Otherwise drag the map to your location.
 Select STREAM TYPE.
 Take a new picture or choose one from your album. The picture should show where you did the measurement.
 Now you need to answer several questions about your observed stream: How large is it? Is the water clean enough to drink it? Is it clean enough to swim in the stream? Furterhmore, you can upload information about the type of river bed material and the colour of the water. Can you see the riverbed? Can you see fishes or other living beings? After answering these questions, you can write down if you see any pollution in the stream as well as if the stream dries out sometimes. If you know the name of the stream, you can note it as well.
 In the comment field, there is place for your remarks. Don’t forget to save your spot in the end.
New measurement: All you need to do is select an existing spot, click on the plus sign (see Spot Update) and then repeat the necessary steps.
Update Spot
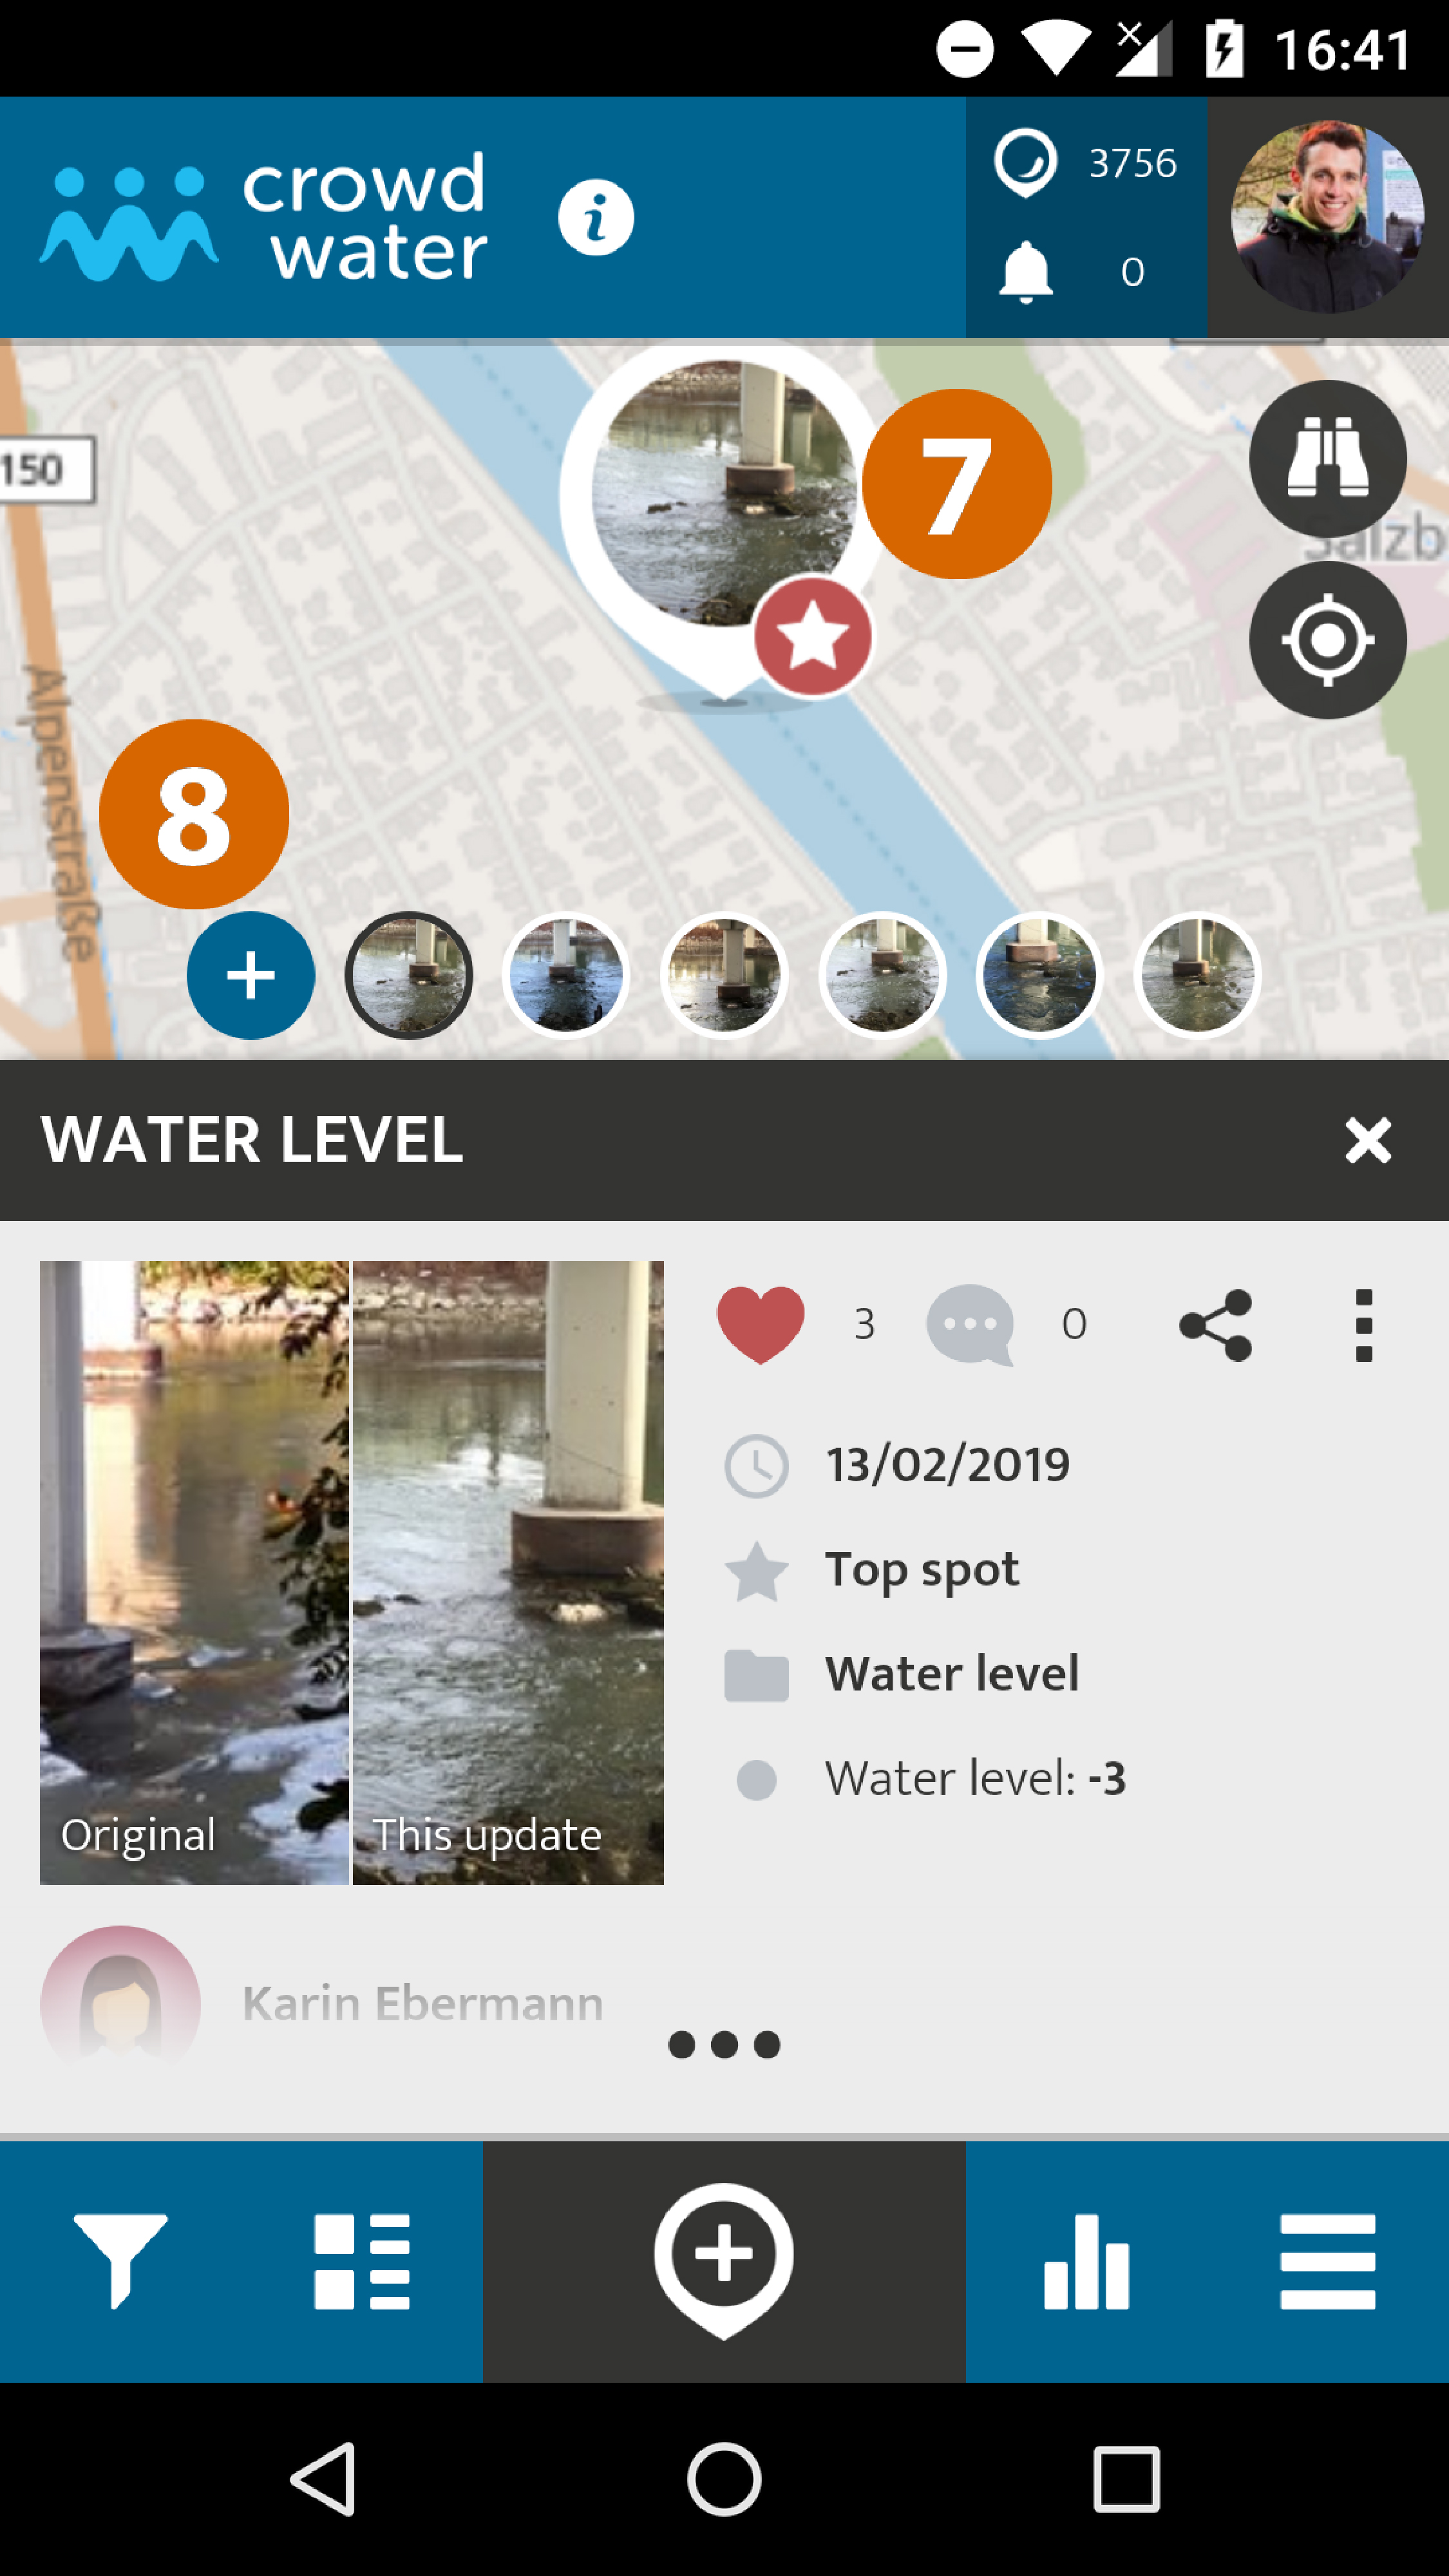

 To make a new measurement at an existing spot, go to its location and click on the spot icon.
 Click the plus sign in the map or at the bottom of the page to open the interface (this is the same for VIRTUAL and PHYSICAL STAFF GAUGE, SOIL MOISTURE, TEMPORARY STREAM, PLASTIC POLLUTION and STREAM TYPE).
 Check the original image to find the exact location of the spot.
 Take a picture of the current situation.
 For VIRTUAL STAFF GAUGE: Compare the original image, including the staff gauge to the current water level situation. Try to look for something in the immediate environment of the virtual staff gauge that you can use as a reference, e.g. a boulder, wall or bridge pillars.
In which class would the current water level be? Mark the category by tapping on the horizontal staff gauge.
For PHYSICAL STAFF GAUGE: Read the actual water level from the staff gauge and enter it in the corresponding unit.
For SOIL MOISTURE: Use your hands or boots to sense the moisture content of the soil and tap the icon of the class that fits your observations best.
For TEMPORARY STREAM: Think about the current flow state of the stream and tap the icon of the class that fits your observations best.
For PLASTIC POLLUTION: Make a new measurement of the actual plastic pollution situation at the spot.
For STREAM TYPE: Enter information about the current state of the stream. Did it change since the last update of the spot?
 Leave a comment in case you found something particularly interesting or striking. Click on SAVE to upload your measurement or scroll down to the Advanced Options (for VIRTUAL STAFF GAUGE, see Streamflow Estimation).
Advanced Options: Streamflow Estimation
Take a look at the video about the streamflow estimation.

 The width of a stream or river is easy to estimate when it is small, but can be quite tricky for wide rivers. Try to imagine a bridge crossing the river. How long would you walk across the water covered part of the channel? A big step is more or less equal to a meter. As a side-note – please estimate the width of the actual water surface, not of the channel. Alternatively you could use a distance estimating app.
 The mean depth of a stream or river can be quite difficult to guess, especially when you cannot see the bottom. Nonetheless, try to guess! Be aware that the average depth is needed, not the maximum. Look at the same cross section as for the width. As a reference – your ankle is about 10 cm high, your knees are about 50-55 cm high and your hips are about 90-100 cm high.
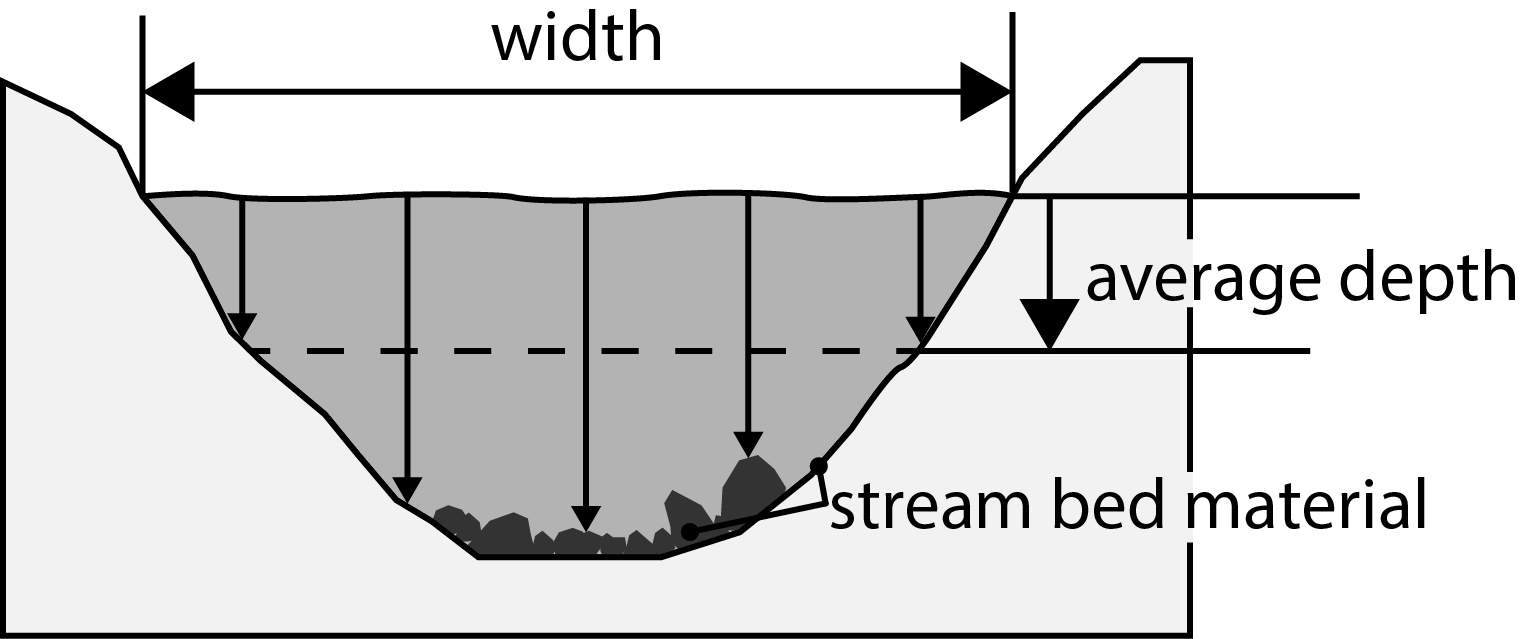
 The material of the stream or river bed can be selected from the drop-down menu. Usually a lot of different grain sizes are present in a river bed. Which one do you see most frequently?
- Mud
- Sand
- Cobbles (bigger than a chicken egg, but smaller than 20 cm diameter)
- Boulders (bigger than 20 cm diameter)
- Bedrock (solid bedrock)
- Concrete
 To enter the flow velocity you can either directly insert a number in meters per second, or you apply the Stick-Method:
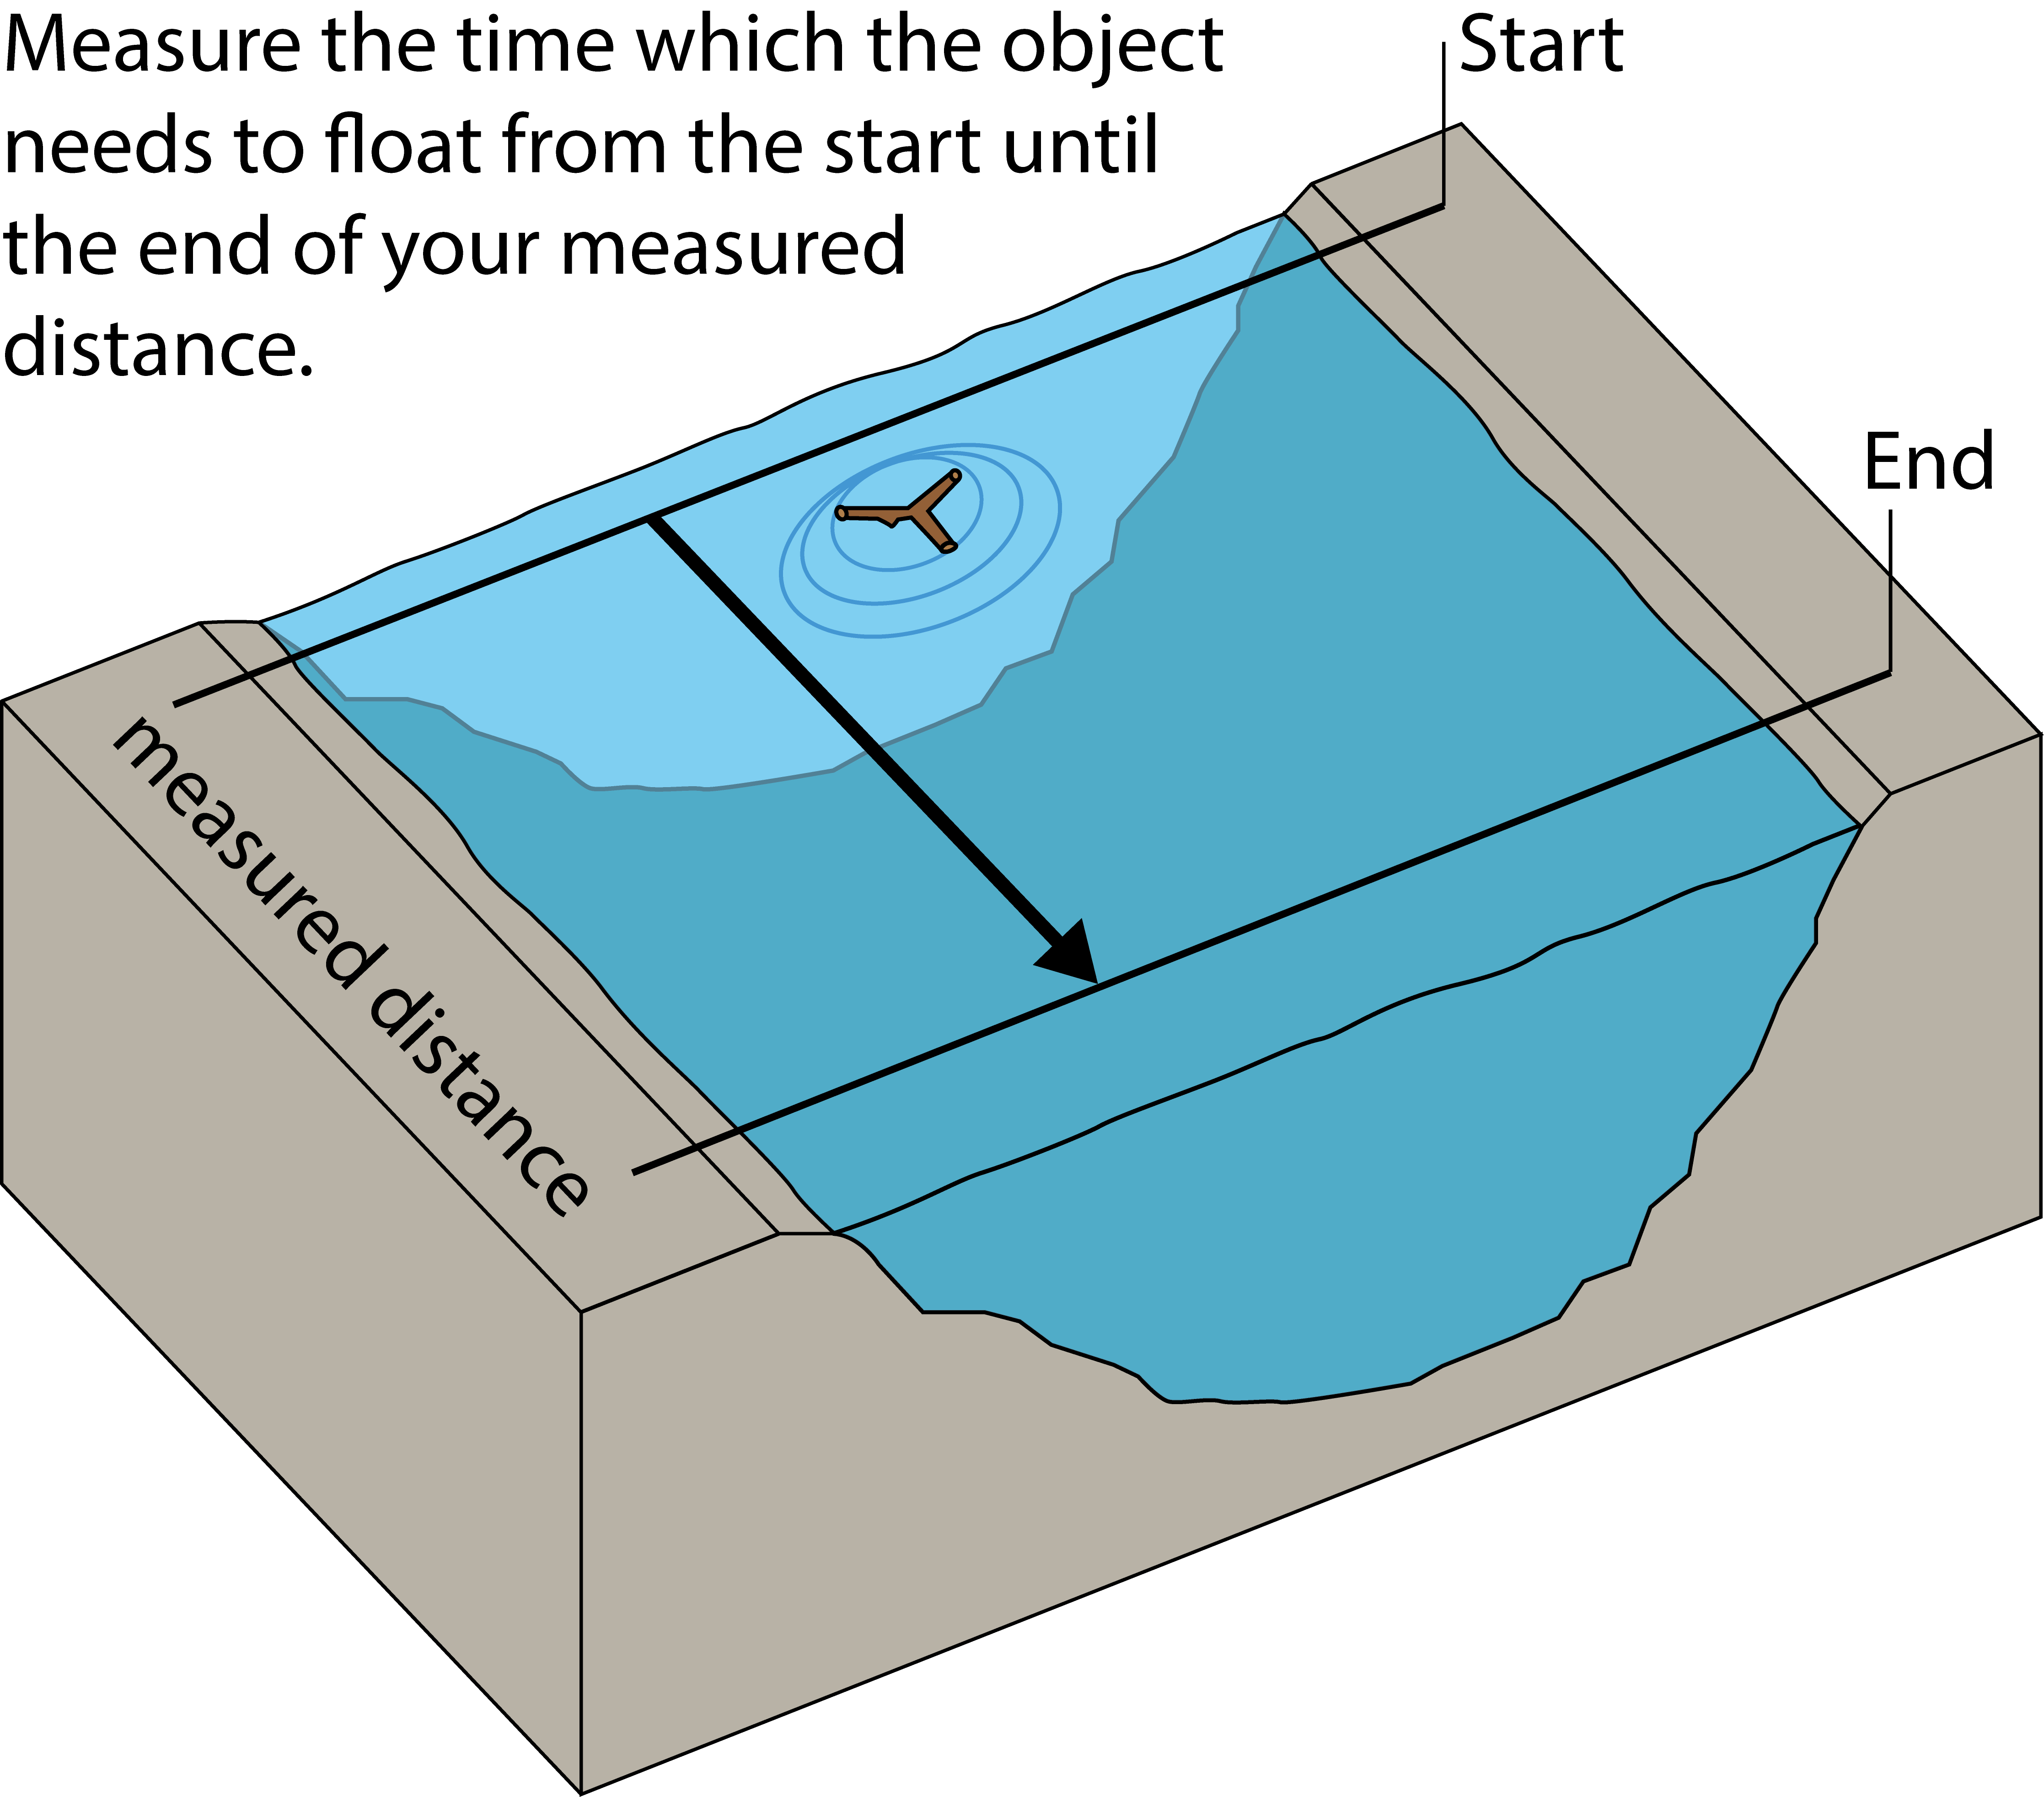
 The flow velocity is measured in m/s, not in km/h. This is mostly, because water flows much slower along a river than a car. If the water flows as fast as you walk it is roughly 1 m/s and it is unlikely to be more than 3 m/s unless there is a flood. To estimate the flow velocity take a certain length along the river bank, e.g. three meters. You can adjust this length according to river size and especially flow velocity. Ideally you mark your length, with twigs, a backpack, water bottle or something similar. Throw a twig, leaf or anything else that floats and is natural (no garbage!) into the water. It should enter the water more or less in the middle of the stream, upstream of your measured distance. Once it passed your starting point count the seconds (or use the timer on your phone) until it passes your stopping point. Now you have the flow velocity. If you would like to be precise, do this two or three times.
Then click SAVE to upload your contribution.
Social Media
In the user-area in your app you’ll find your personal newsfeed with the latest activities of your friends and of the CrowdWater project, the collection of your spots, your Badges and your profile information. You can edit it by clicking on the pen-symbol. If you swipe left or right, you’ll find the list of users who are following you and those you are following.
- Like observations or comments: If you like a spot, a new measurement or a comment, show it to the others by clicking on the heart symbol.
- Comment observations: You can comment observations of others and yourself.
- Share observations: You can share your observations on Facebook, Twitter and Google+. If you copy the link you can send it to anyone with any other app.
- Follow / Unfollow others: Follow other users, so you don’t miss any of their contributions. Click their profile picture and then hit the FOLLOW button. In the same way you can also unfollow them. In the menu you can search other users by their username across all SPOTTERON apps.
Badges
Per contribution (new spot or spot update) in the CrowdWater app you receive one point. When you reach a certain amount of points you will be rewarded with a corresponding badge and a fun fact. The more contributions you have made, the harder it is to get new badges and sometimes they come unexpected.

Here you see the first nine badges. Discover more as you add more observations.
Frequently Asked Questions (FAQ)
Can I add new spots, even when I have no internet connection?
If you don’t have an active internet connection in some location, you can still set up new spots. Just proceed as normal, take a picture and fill in the fields. At the end click on the hour glass-symbol instead of SAVE. Then your spots are saved in the Main Menu under WAITING SPOTS. You can then edit these later (e.g. to make sure your GPS-position is set correctly on the map) and then upload them manually by clicking SAVE.
Additionally, under OFFLINE MAPS & SPOTS you can download maps in advance, so you only need your GPS-position when outside. During the map download the 20 latest spots within the area are also downloaded. In case you want to make sure that a specific spot is being downloaded, see the next question.
Can I add new measurements to an existing spot when I am offline?
For this you can either download a map area in the Main Menu under OFFLINE MAPS & SPOTS and thereby the 20 latest spots within the map extent are downloaded as well. In case you want to download only single spots without the maps, you can open a spot by clicking on the marker on the map and then click on the three vertical dots in the spot view and select “Download spot to device”.
Are the spots that I created offline uploaded automatically as soon as I have an active internet connection?
No, you will have to do this manually in the Main Menu in WAITING SPOTS. Sometimes, the GPS position was not recorded correctly in these spots. It is therefore good practice to review these spots before uploading them.